Quiz Toolkit
| 🏆 This is a premium feature |
|---|
MecSimCalc supports online quizzes. We can randomize the given values in question, collect quiz results when student run Mecsimcalc App, and send them to your Google Spreadsheet or send email notification. We also support integration with Canvas to collect quiz grades.
Create the Quiz App
In this tutorial, you will learn how to create a quiz app using MecSimCalc with different types of questions.
Numerical Question
For example, you can create a quiz app that asks students to solve a math problem and input their answer. The app will then compare the student's answer with the correct answer and grade it.
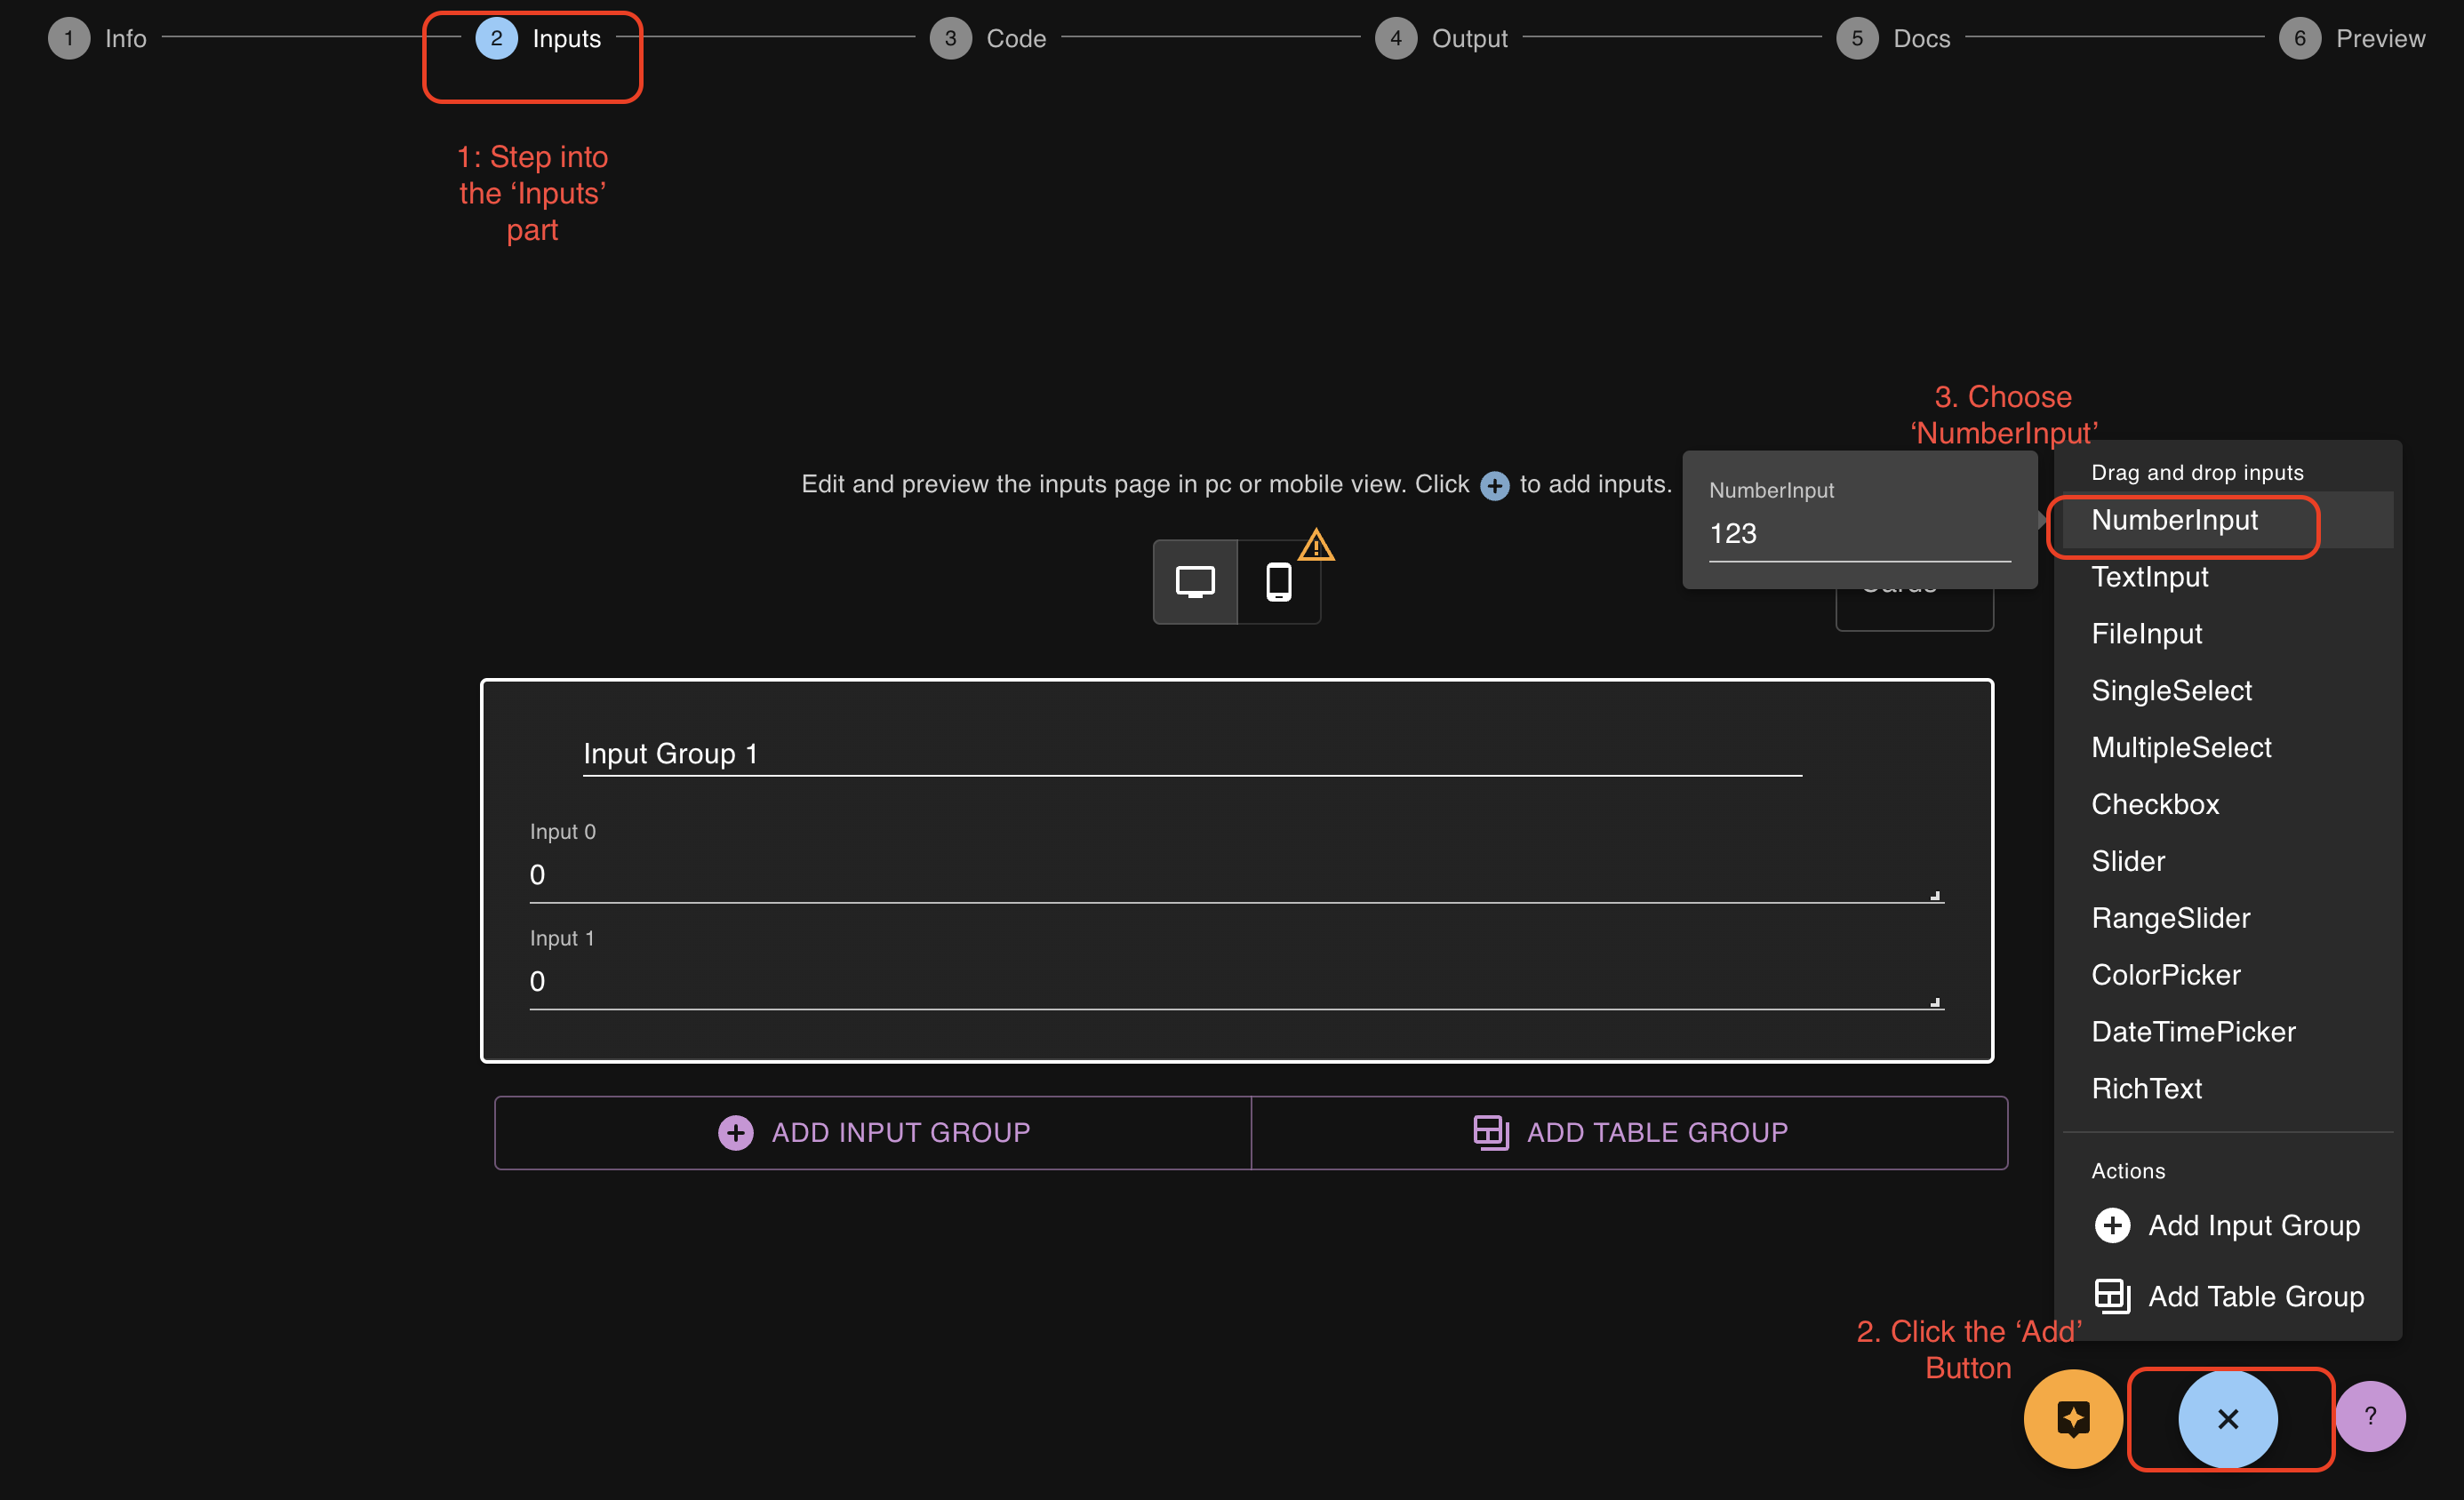
1) Create a NumberInput for Student to Input Answer
Follow the steps below to create a NumberInput as a variable in question and for students to input their answer:
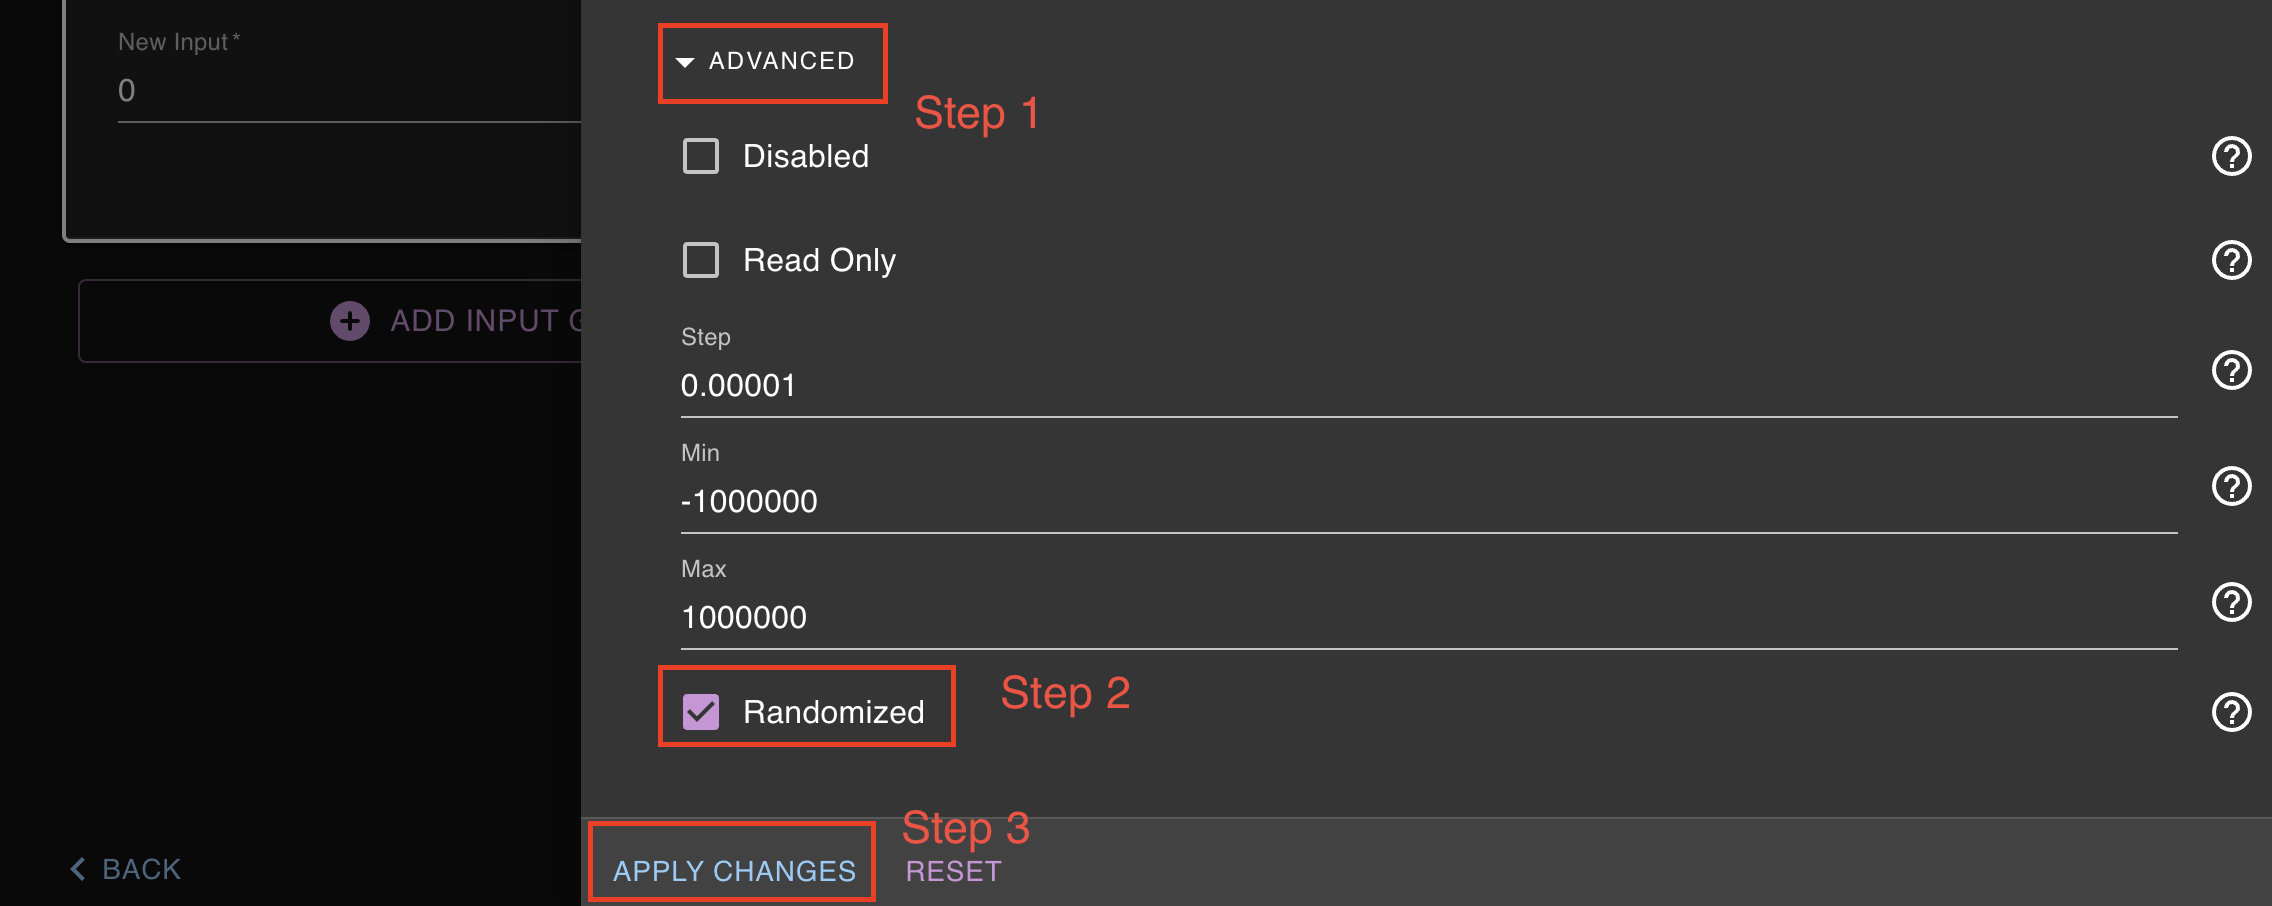
2) How to randomize variables in question
Click the Blue Edit button to edit the NumberInput, click the ADVANCED menu, select Randomize Input.
After you set up the Step, Min and Max for the NumberInput, the value will be randomized everytime when the student runs the app.
3) Python Code for Compare Answer and Grade it
You can implement the logic to calculate the correct answer in the Python code. Click here to find out how to write Python code in MecSimCalc.
Algebraic Question
Mecsimcalc allows you to verify if two algebraic expressions are mathematically equivalent.
All you need to do is to install sympy library. Click here to see how to install Python packages in your environment
For example, assume that you want to compare if two expressions are the same or not, checkout this example:
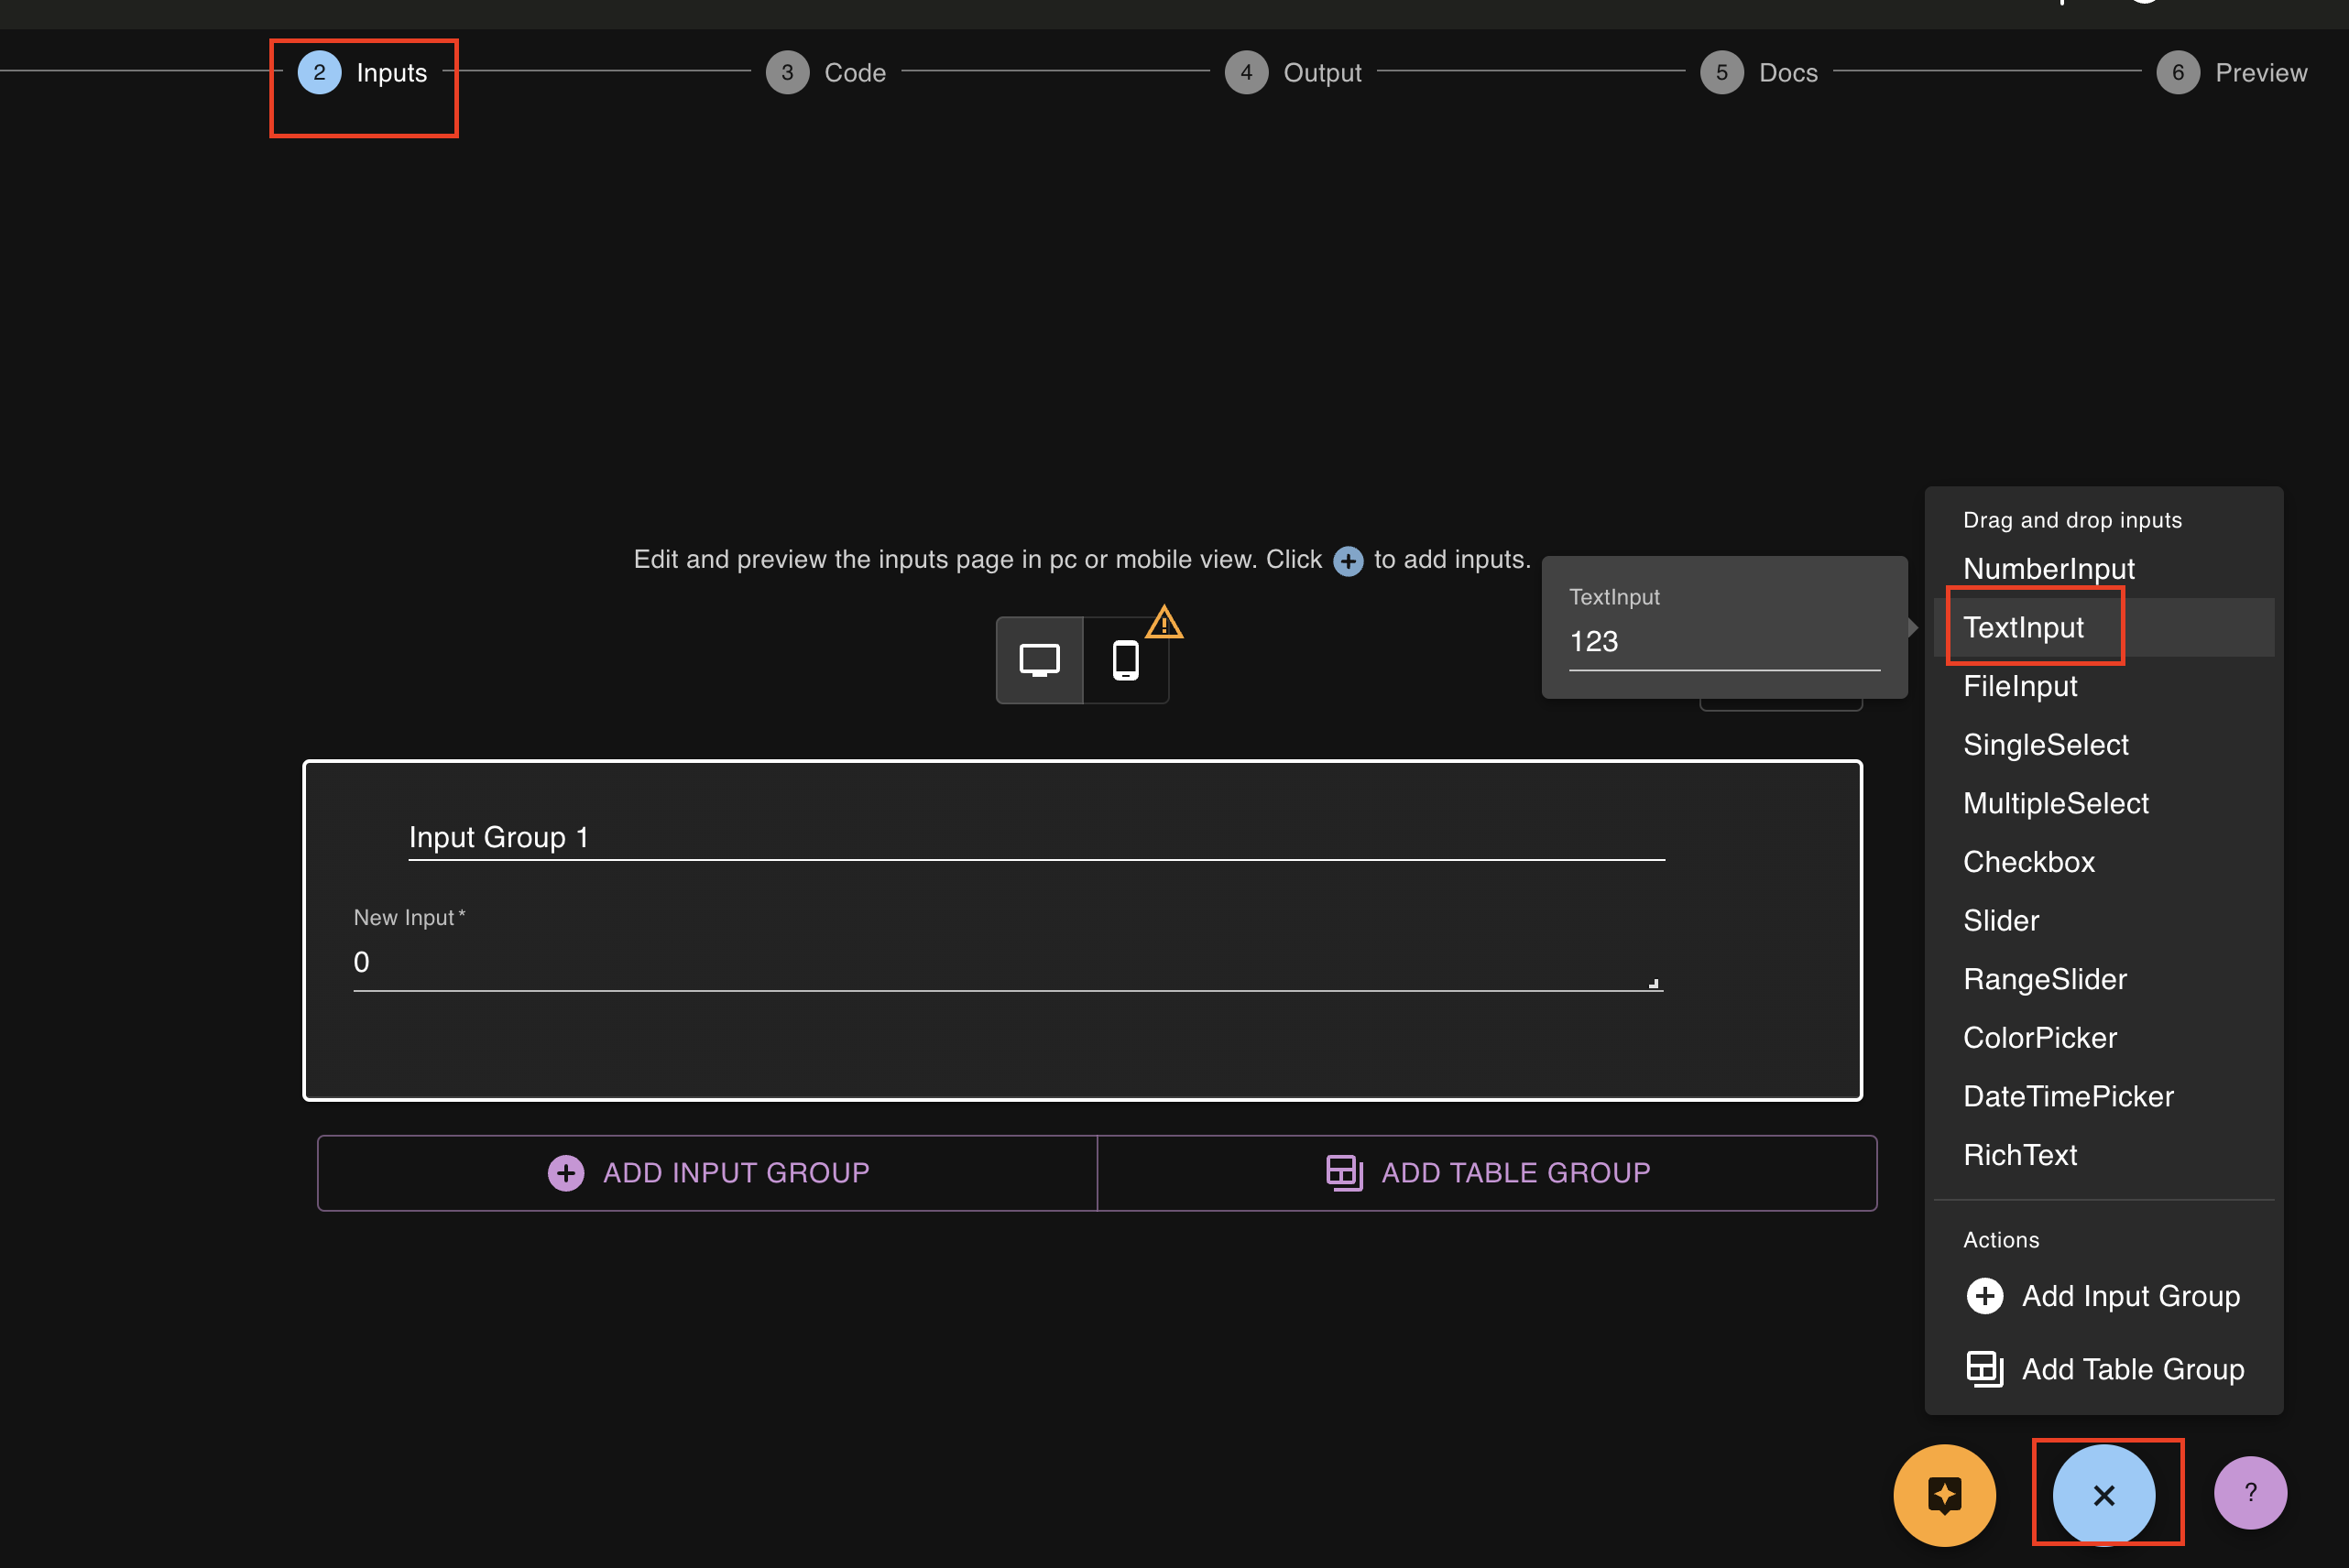
1) Create a TextInput for Student to Input Answer
Follow the same steps before, creating a NumberInput for students to input their answer:
 The algebraic expression input will be saved as a
 str type. For example, you can input x^2 + 2*x + 1 as the algebraic expression.
2) How to compare two algebraic expressions
Here we demonstrate the code of above example. You can use the function below:
import sympy as sp

def check_expressions_equal(expr1_str, expr2_str):

   # Convert the string representations to SymPy expressions
   expr1 = sp.sympify(expr1_str)
   expr2 = sp.sympify(expr2_str)

   # Simplify the difference between the two expressions# and check if the result is equal to zero
   # If the result is zero, the expressions are equal, otherwise they are not
   return sp.simplify(expr1 - expr2) == 0, expr1, expr2
And below is the main code part:
def main(inputs):
   expr1=inputs['func_1']
   expr2=inputs['func_2']

   res, expr1, expr2 = check_expressions_equal(expr1,expr2)

   # convert to latex expression
   latex_expr1 = sp.latex(expr1)
   latex_expr2 = sp.latex(expr2)

   return {"result": res, "String1": latex_expr1, "String2": latex_expr2}
3) Displaying Results
Below is the Output code of above example to display the results in LaTex format:
{% if outputs.result %}
These two equations are the same
{% else %}
These two equations are not the same
{% endif %}

Equation 1: {{ outputs.String1 | katex}}
Equation 2: {{ outputs.String2 | katex}}
Click here for more information about writing LaTex in your output.
Retrieving Quiz Results
In this section, we will show you how to retrieve quiz results and send them to your Google Spreadsheet, Gmail and Canvas.
Export Results to Google Sheets
MecSimCalc has its own function that can be used. Users can append data to their own Google Sheets by calling append_to_google_sheet.
Check out the example first to see what the result will look like in the Google Sheet.
Arguments:
| Argument | Type | Description |
|---|---|---|
service_account_info | dict | The credentials used for Google Sheets API authentication. |
spreadsheet_id | str | The unique identifier of your Google Spreadsheet. |
values | list of lists | The data to append. Each list element represents a row of data. |
range_name | str (optional) | The A1 notation of the range to start appending data (Defaults to 'Sheet1!A1'). Generally, there is no need to make changes.. |
include_timestamp | bool (optional) | If True, appends the current timestamp to each row of data (Defaults to True). |
Learn how to get spreadsheet_id, service account info!
All you need to do is add:
values = [
    [ inputs['name'], inputs['id'], grade ],
]

msc.append_to_google_sheet(service_account_info, spreadsheet_id, values)

# if you don't want to include timestamp
msc.append_to_google_sheet(service_account_info, spreadsheet_id, values,
include_timestamp=False)
Quiz values will append to your Google Sheet:

How to Get Spreadsheet ID
You need to create a Spreadsheet first. The Spreadsheet ID is the last string of characters in the URL for your spreadsheet.
For example, in the URL https://docs.google.com/spreadsheets/d/1qpyC0XzvTcKT6wQoFDE8p-Bll4hps/edit#gid=0 , the spreadsheet ID is 1qpyC0XzvTcKT6wQoFDE8p-Bll4hps
How to Get Service Account Info
Step 1: Enable the Google Sheets API
Before integrating Google APIs into your project, you must enable them within a Google Cloud project. This process allows you to activate one or multiple APIs under the same project umbrella.
-
First, navigate to the Google Cloud Console and activate the Google Sheets API through the following link: Enable the Google Sheets API.
-
Next, you'll need to create a Google Cloud Project if you haven't done so already. Detailed instructions can be found here: Create a Google Cloud Project.
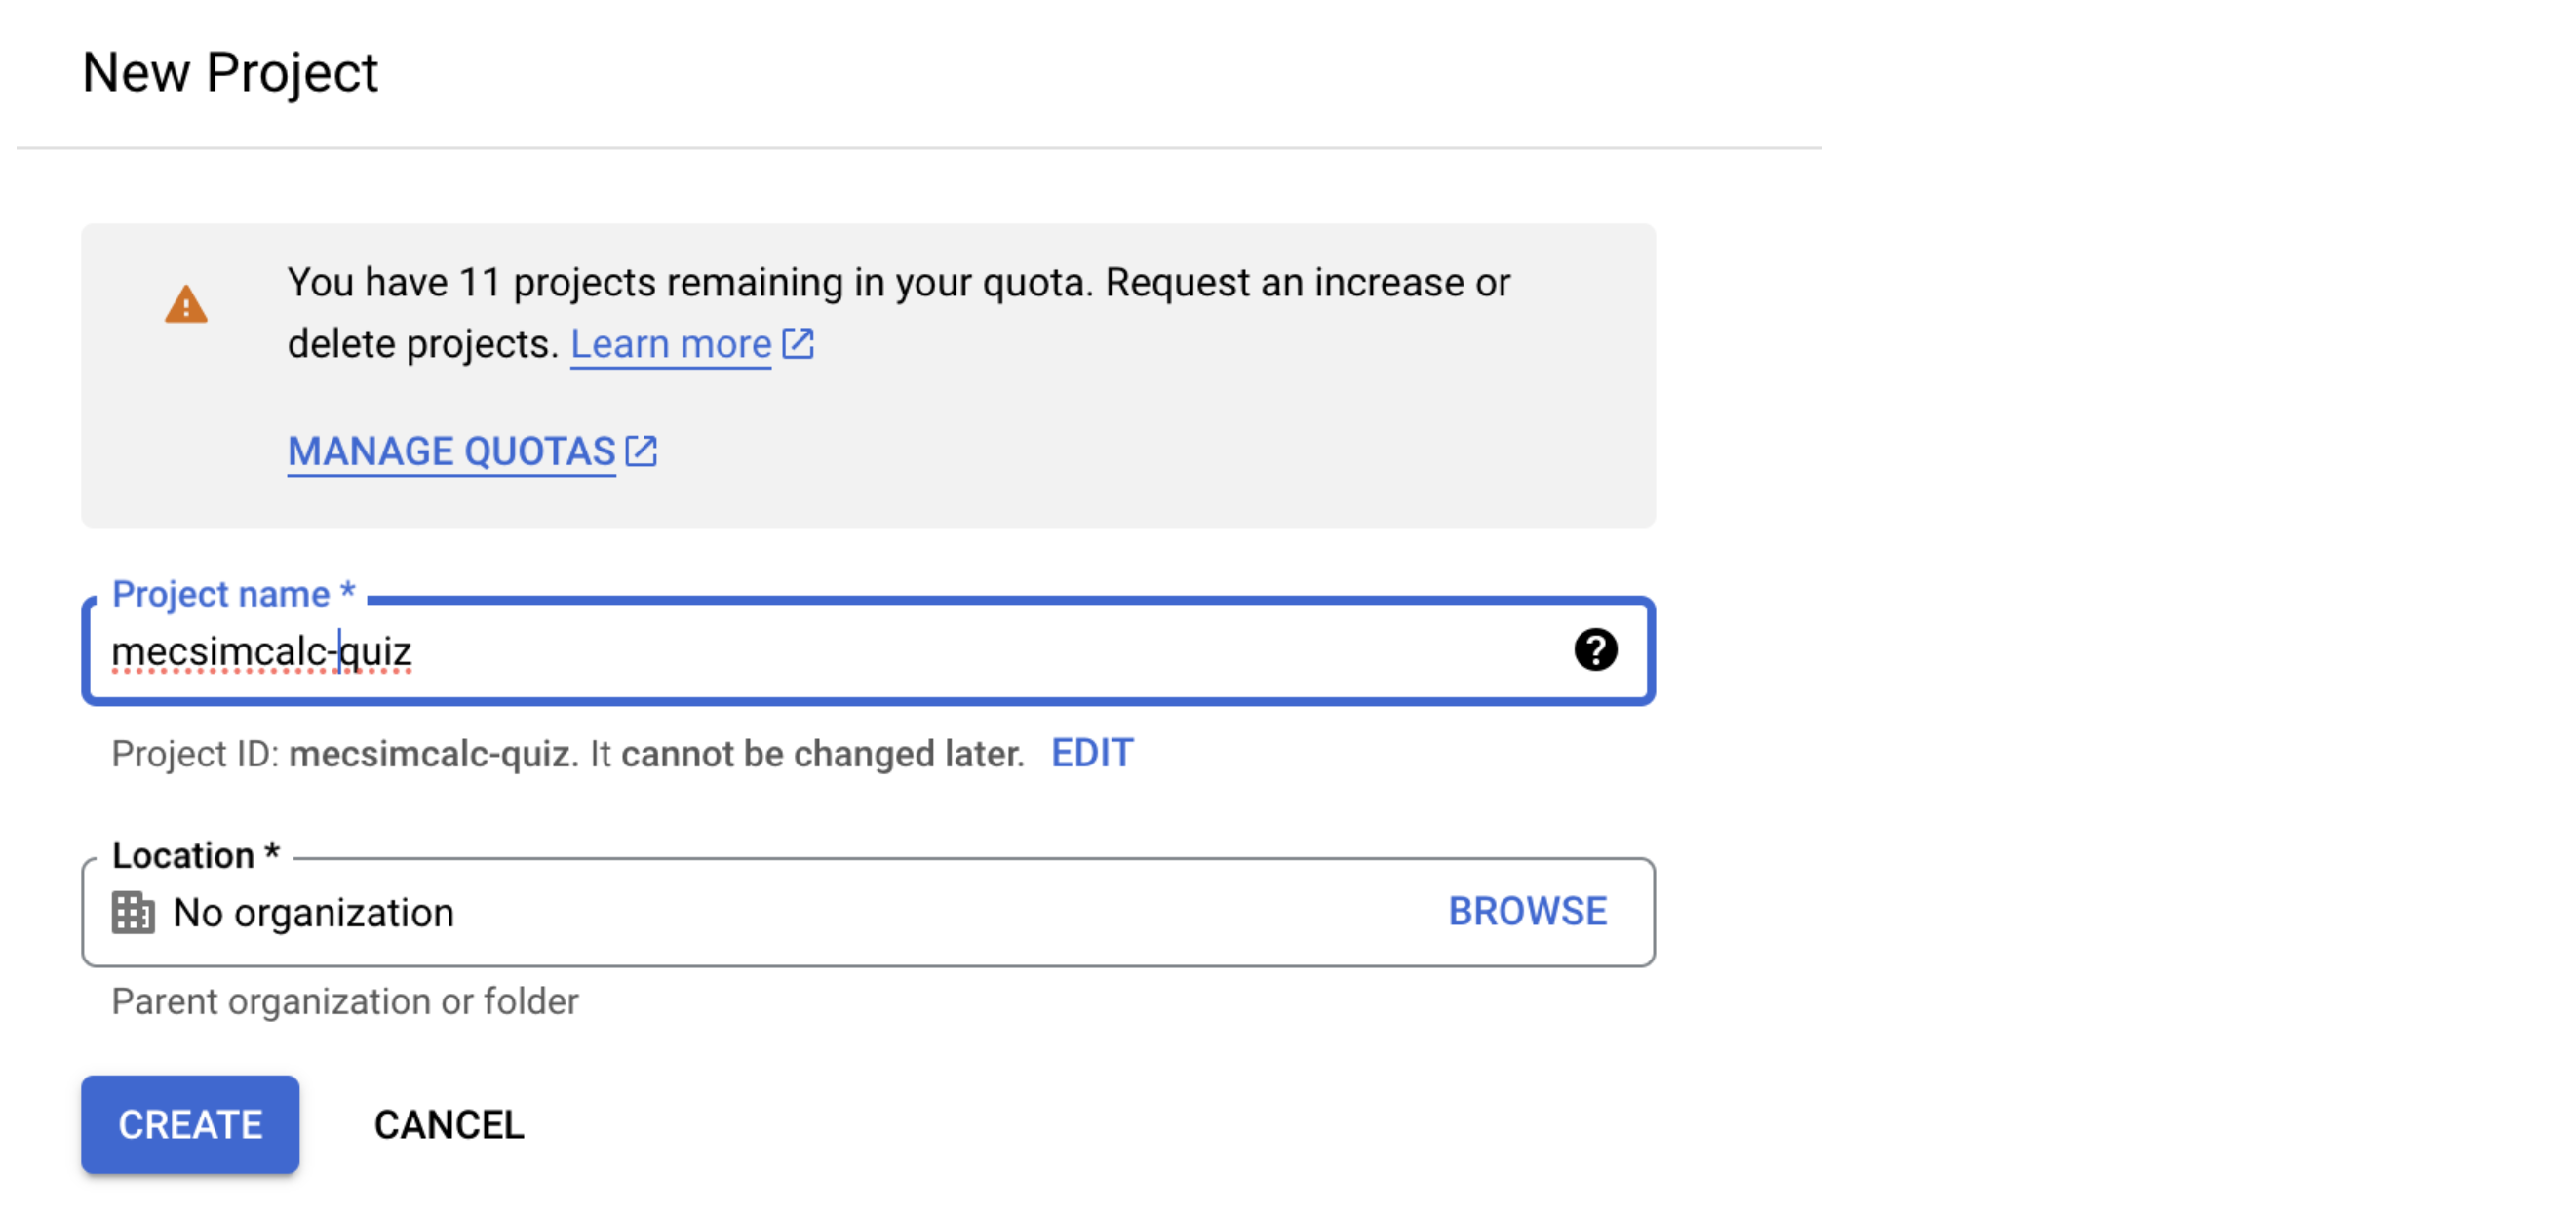
Step 2: Create Service Account Credentials
To authenticate your application with Google's APIs, follow these steps to create and obtain service account credentials:
-
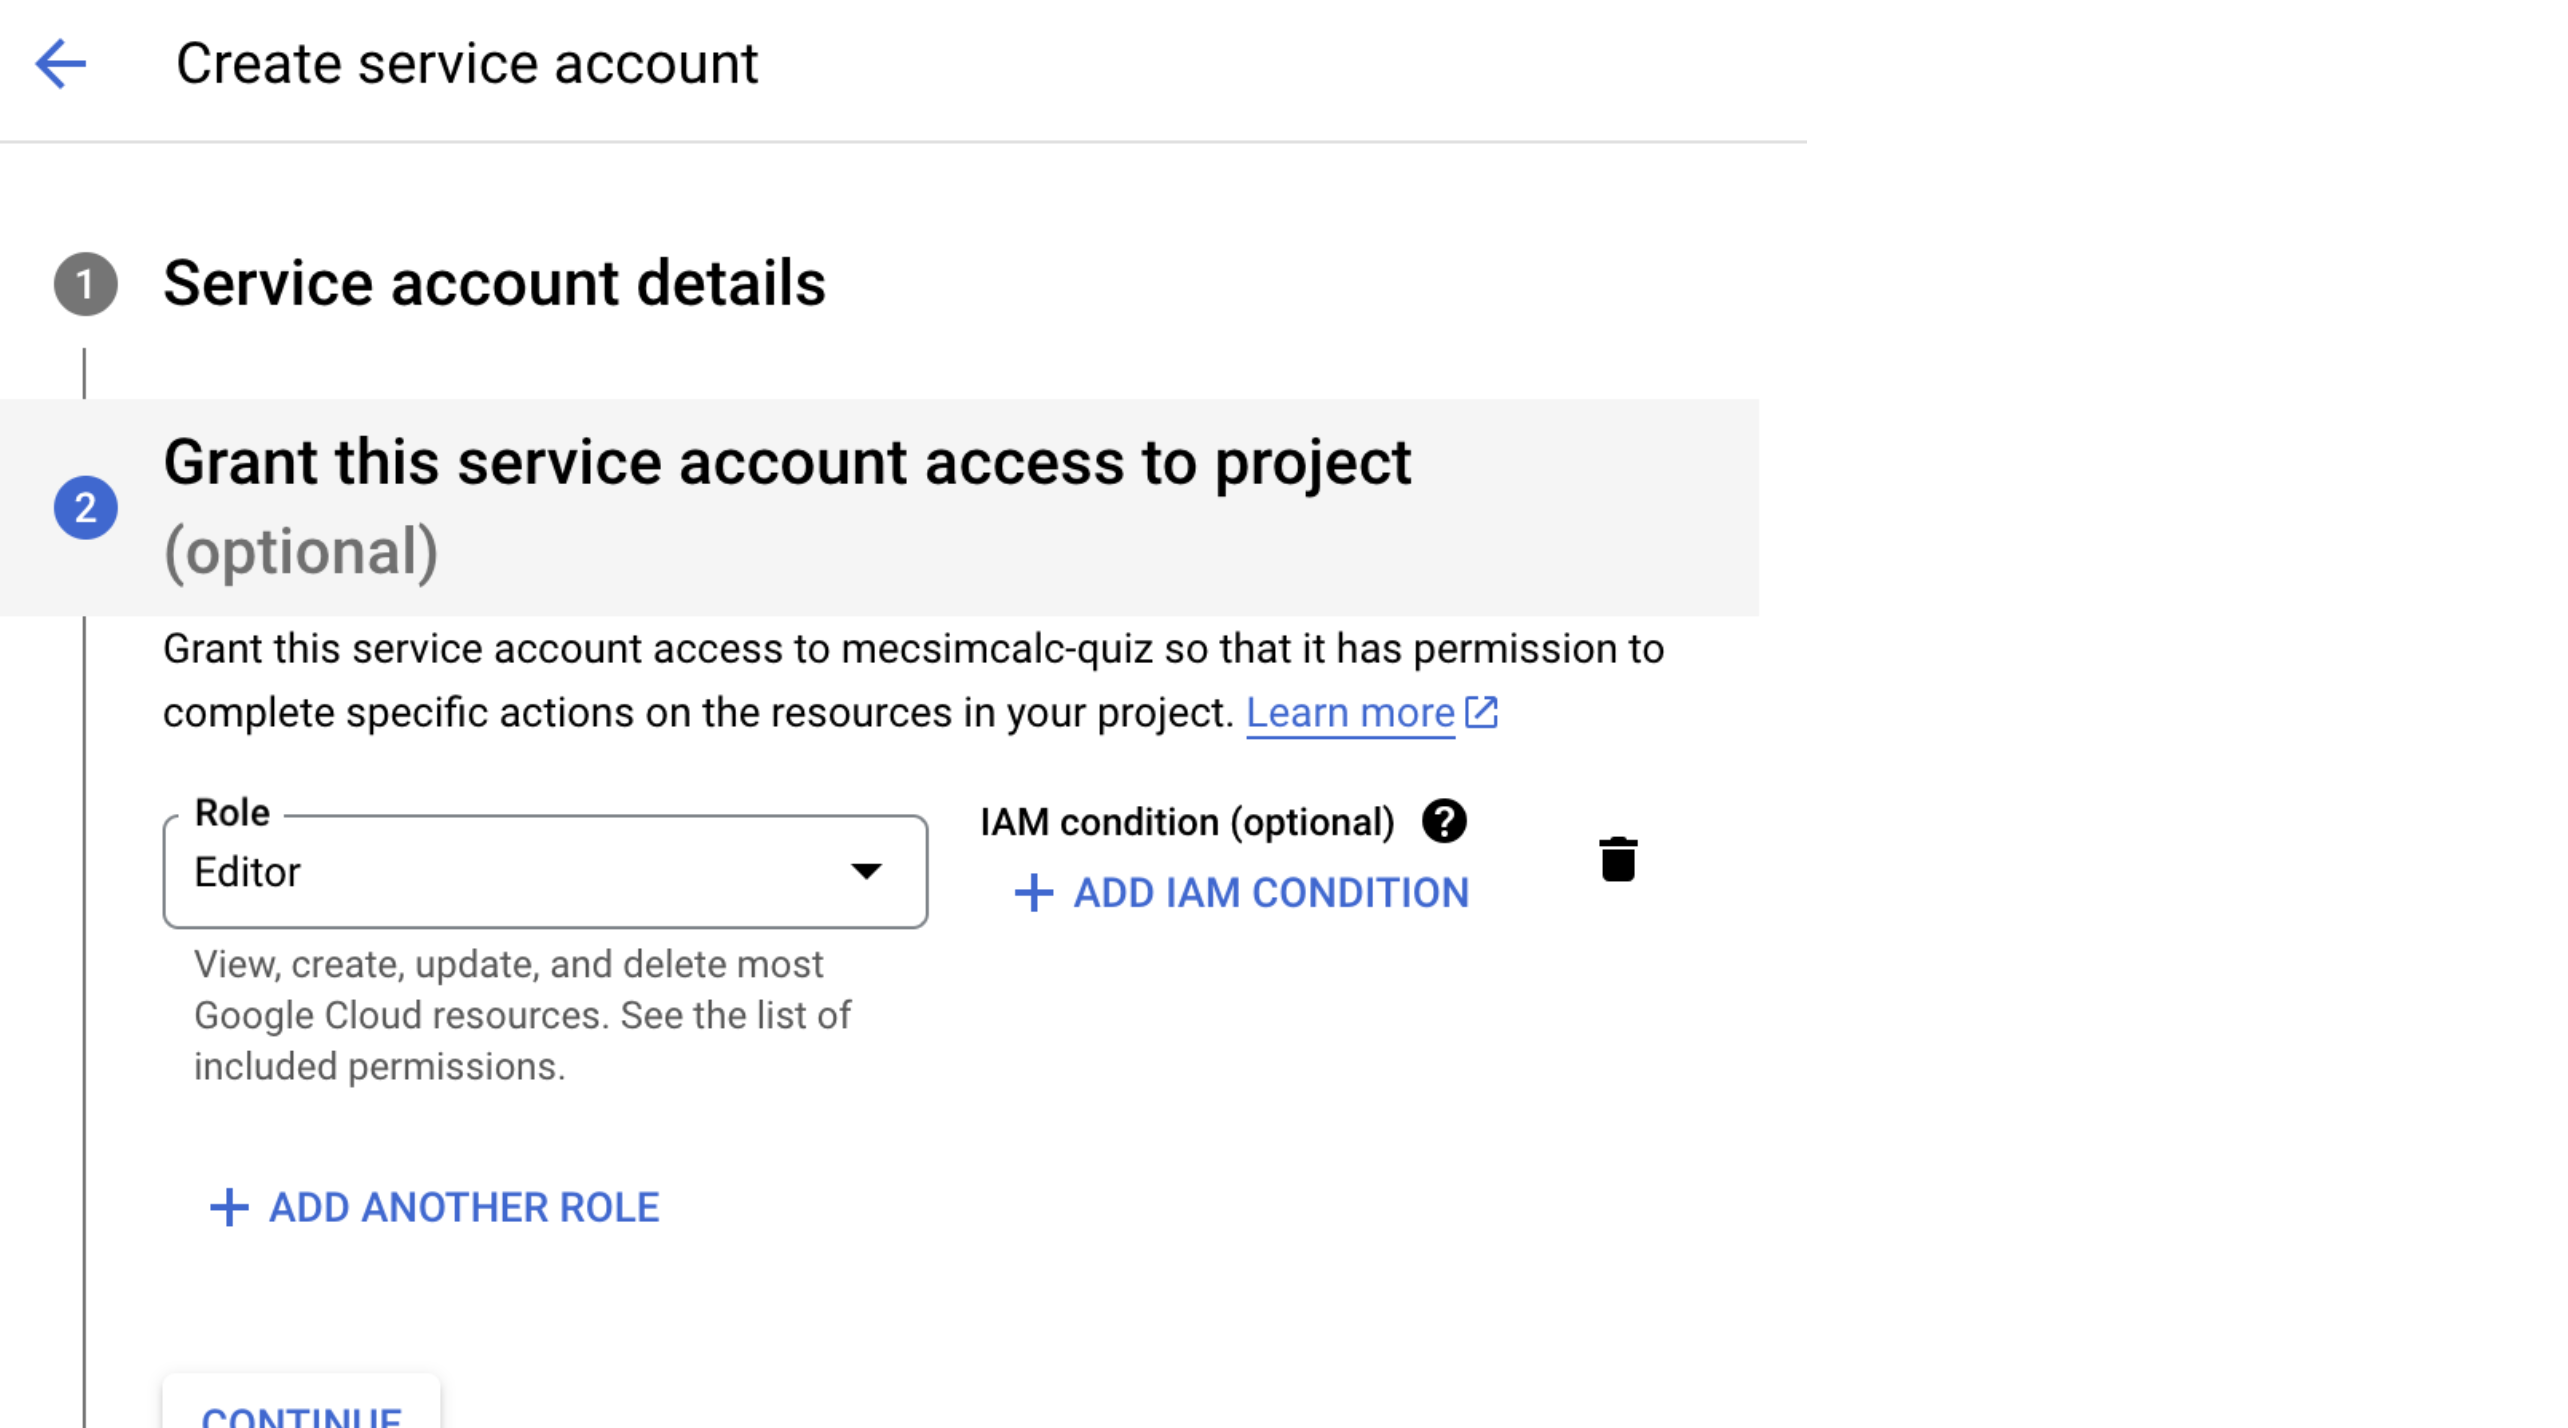
In the Google Cloud console, go to Menu > IAM & Admin > Service Accounts.
-
Choose your service account. If you don't have one, create a new service account and assign it the Editor role for adequate permissions.
-
Navigate to Keys > Add Key > Create New Key, and select the JSON option. Upon clicking Create, a JSON file containing your new key pair will be downloaded.
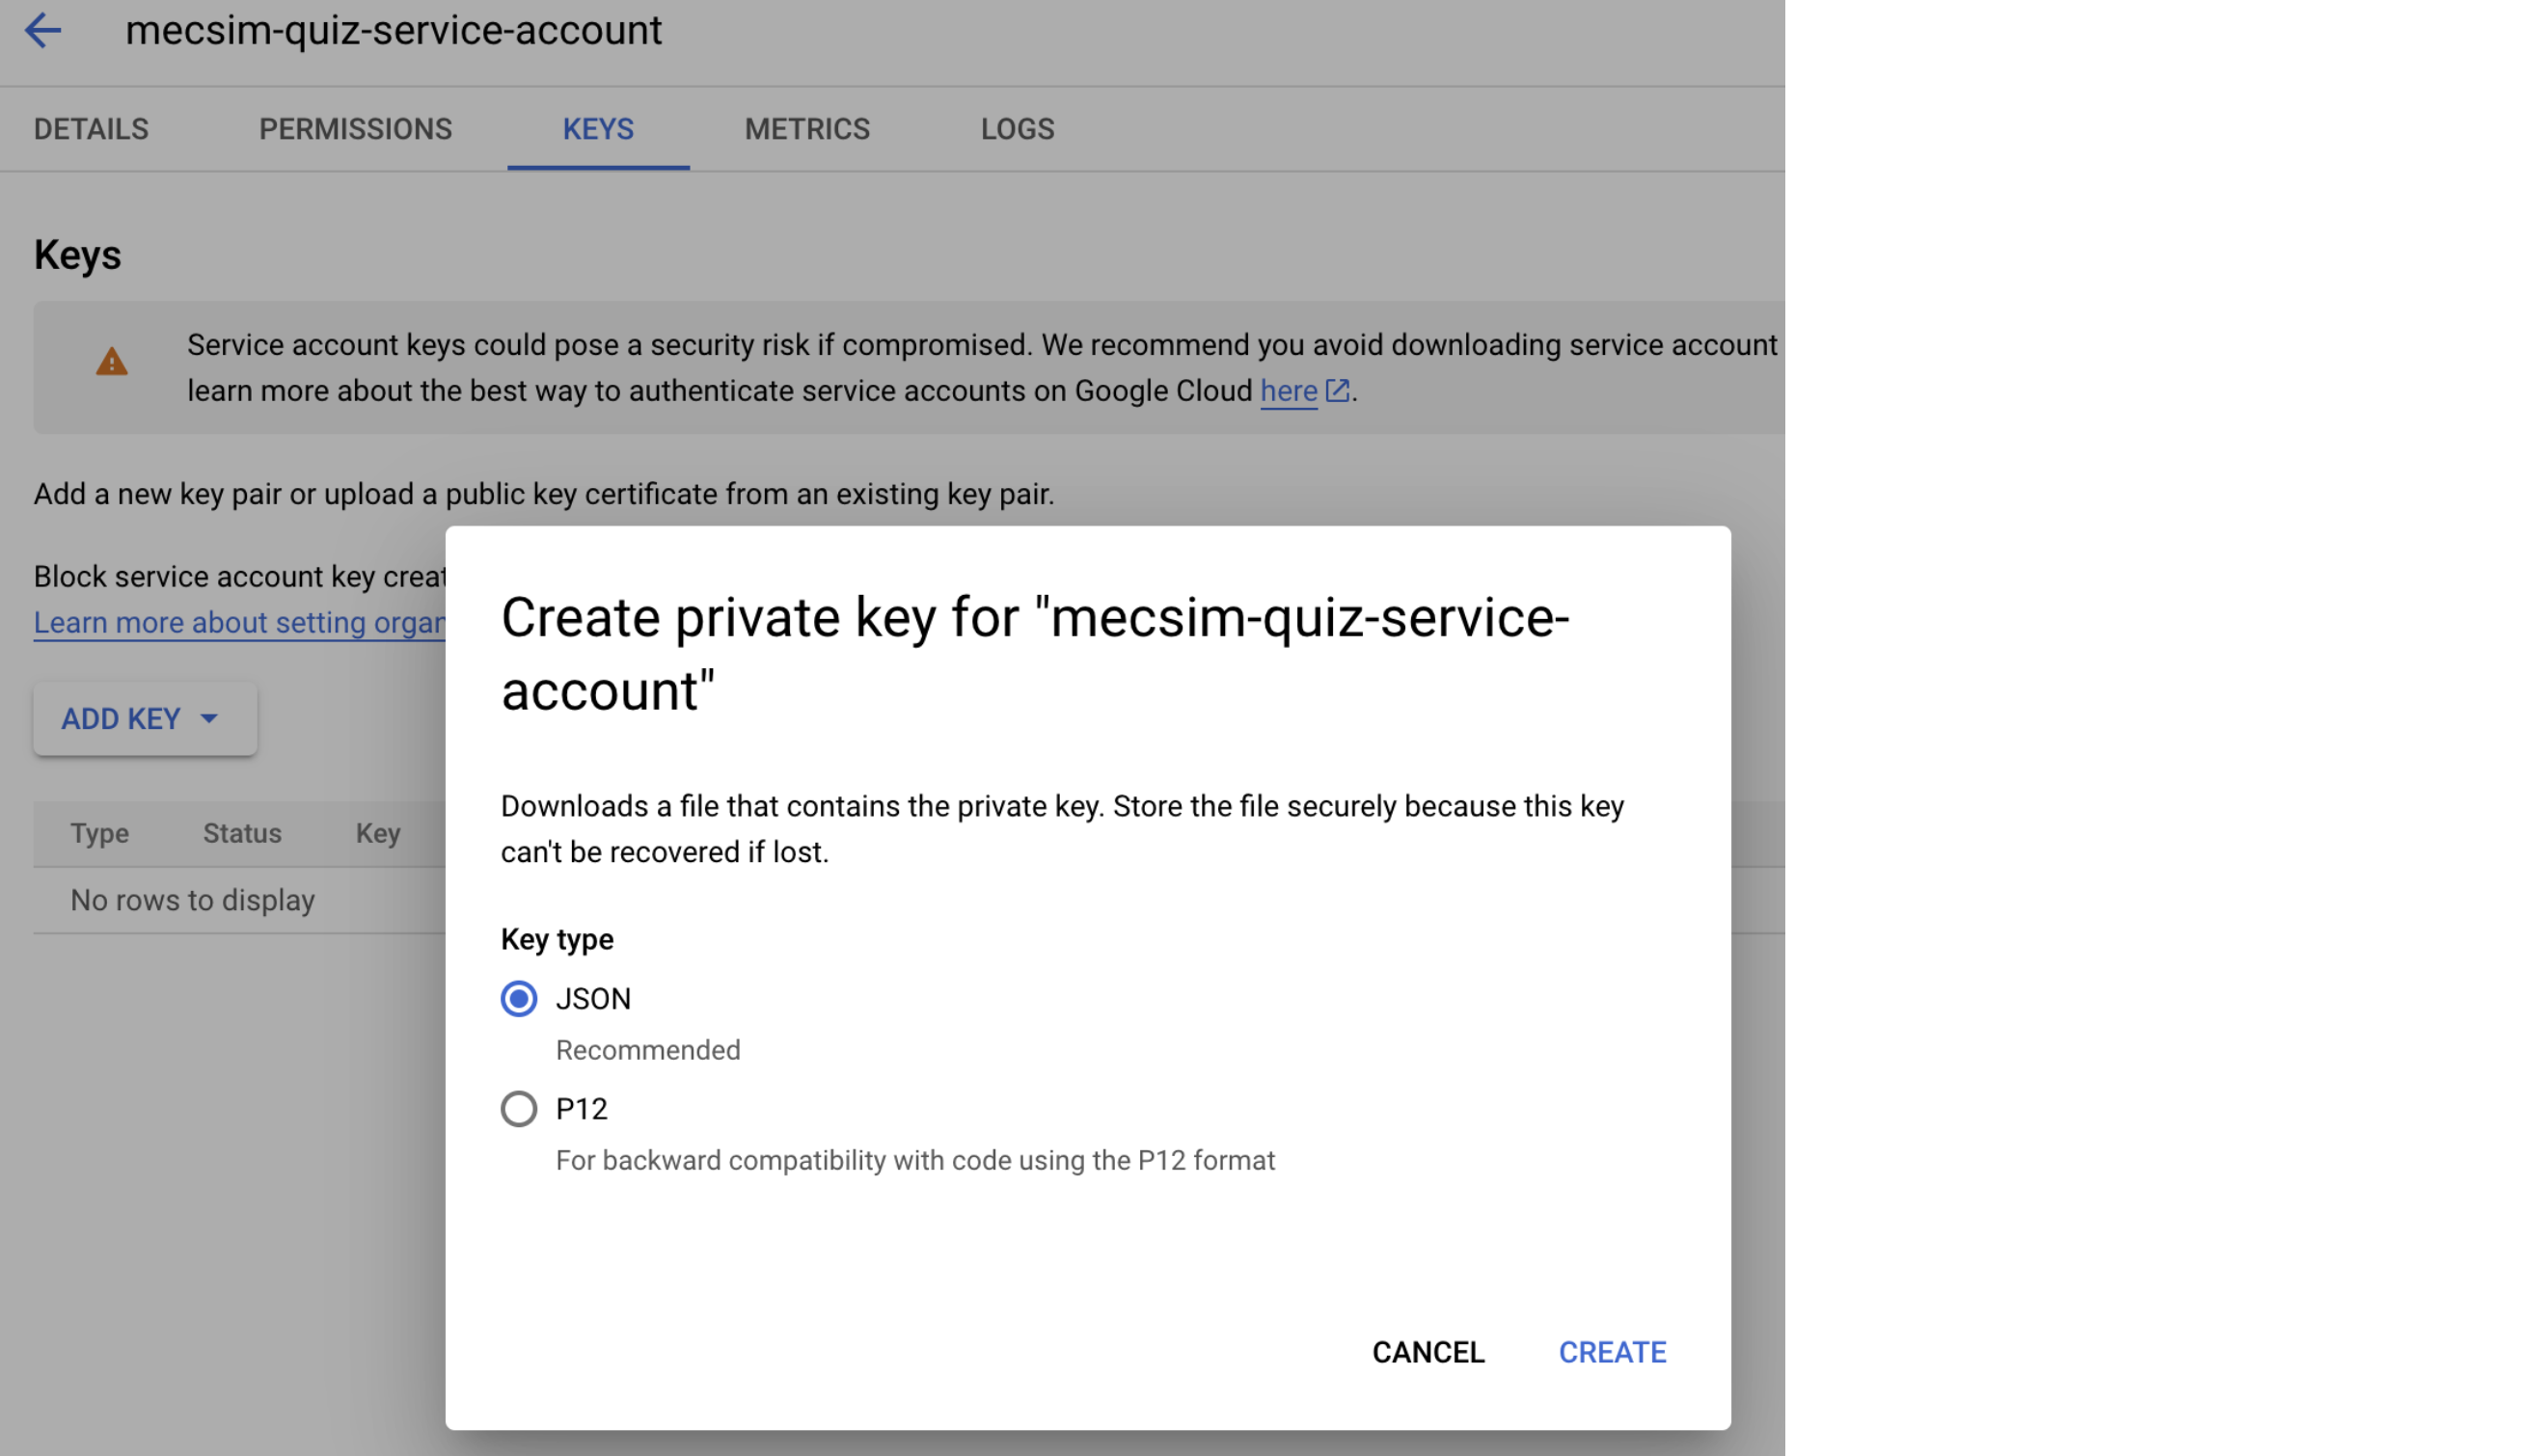
-
Save the JSON file as
credentials.jsonin your project directory. This file contains your service account's credentials, which you'll use to authenticate your application. Here's what the JSON file looks like:
{
  "type": "service_account",
  "project_id": "your-project-id",
  "private_key_id": "private_key_id",
  "private_key": "-----BEGIN PRIVATE KEY-----…-----END PRIVATE KEY-----\n",
  "client_email": "your-service-account-email",
  "client_id": "your-client-id",
  "auth_uri": "https://accounts.google.com/o/oauth2/auth",
  "token_uri": "https://oauth2.googleapis.com/token",
  "auth_provider_x509_cert_url": "https://www.googleapis.com/oauth2/v1/certs",
  "client_x509_cert_url": "your-client-x509-cert-url"
}
The contents of credentials.json will be used as the service_account_info parameter. Simply copy this information and pass it to the append_to_sheet() function as the service_account_info argument.
Email Results to Student/Instructor
You can use send_gmail function.
Arguments:
| Argument | Type | Description |
|---|---|---|
sender_email | str | The email address of the sender. |
receiver_email | str | The email address of the receiver. |
subject | str | The subject line of the email. |
app_password | str | The app-specific password for the sender's email account. |
values | list | A list of lists. Each list contains data to be included in the email body. |
Learn how to get an app_password!
For example, you can retrieve the student's name and id from the input, calculate the grade through code, and this information can be sent to the receiver's email. All you need to do is add :
values = [
        ["Joe", "186234", 85]
]
msc.send_email(sender_email = "sender_email@gmail.com",
               receiver_email = "receiver_email@example.ca",
               subject = "Quiz Results",
               app_password = "xxxx xxxx xxxx xxxx",
               values = values)
Then receiver will get an email like this:

How to Create a Google App Password
Official Google support page: Create & use App Passwords.
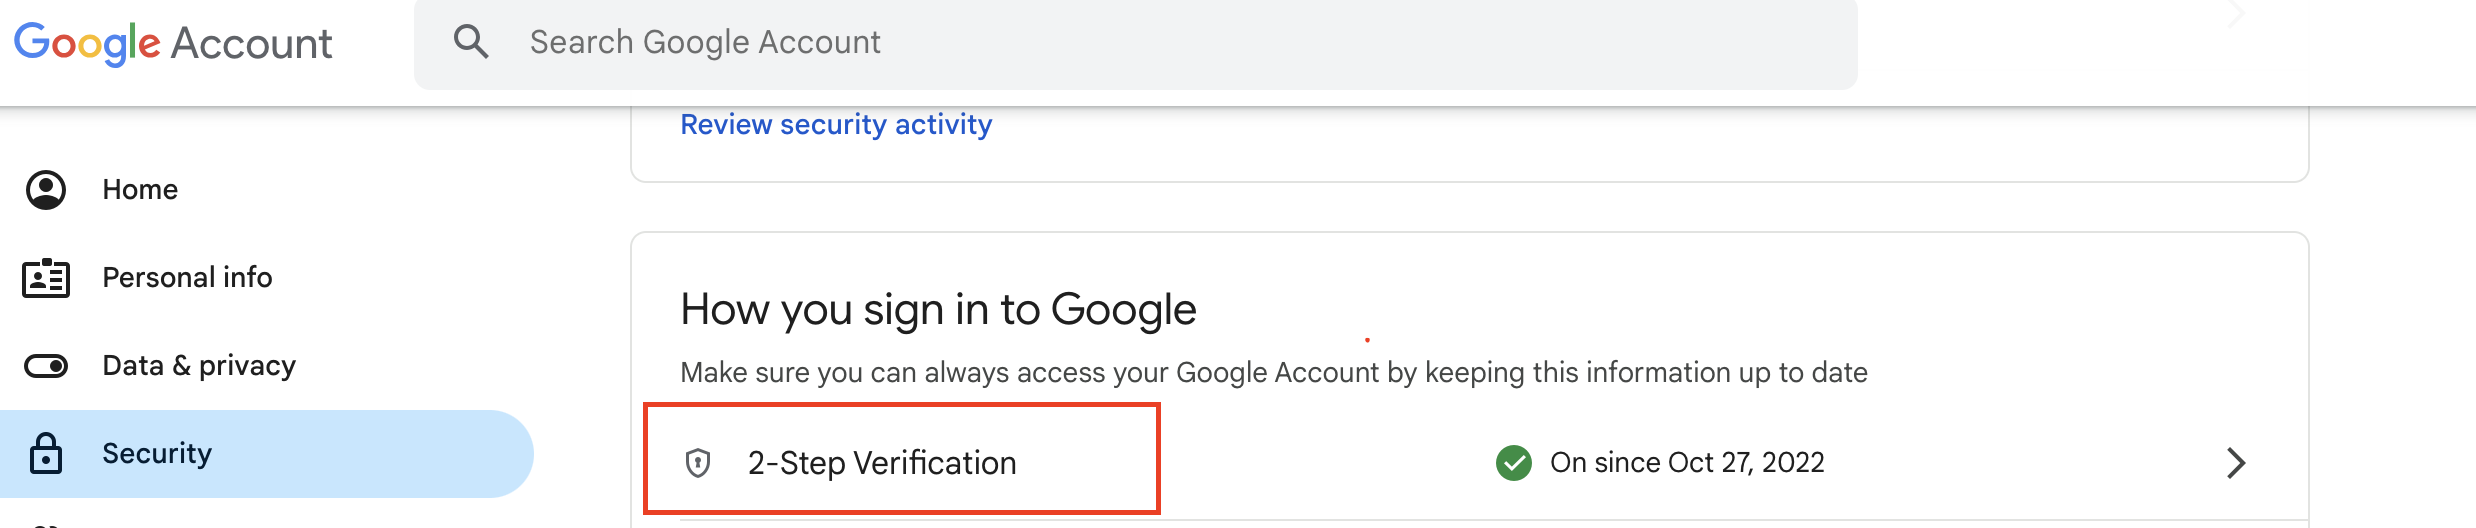
An app password is a 16-digit code that allows less secure apps or devices to access your Google Account. This is especially useful if you have 2-Step Verification enabled and the app you're using doesn't support "Sign in with Google." Here’s how to create one:
- Go to your Google Account.
- Select Security.
- Under "Signing in to Google," select 2-Step Verification.
- At the bottom of the page, select App passwords.
- Enter a name that helps you remember where you’ll use the app password.
- Click Generate to obtain the 16-digit app password.
- Make sure to save the app password (as you won't be able to see it later) and then copy it into your quiz app
Integration with Canvas Gradebook (Beta)
We are still working on this feature, and it is currently in beta.
Mecsimcalc integrates with Canvas, enabling professors to collect quiz grades.
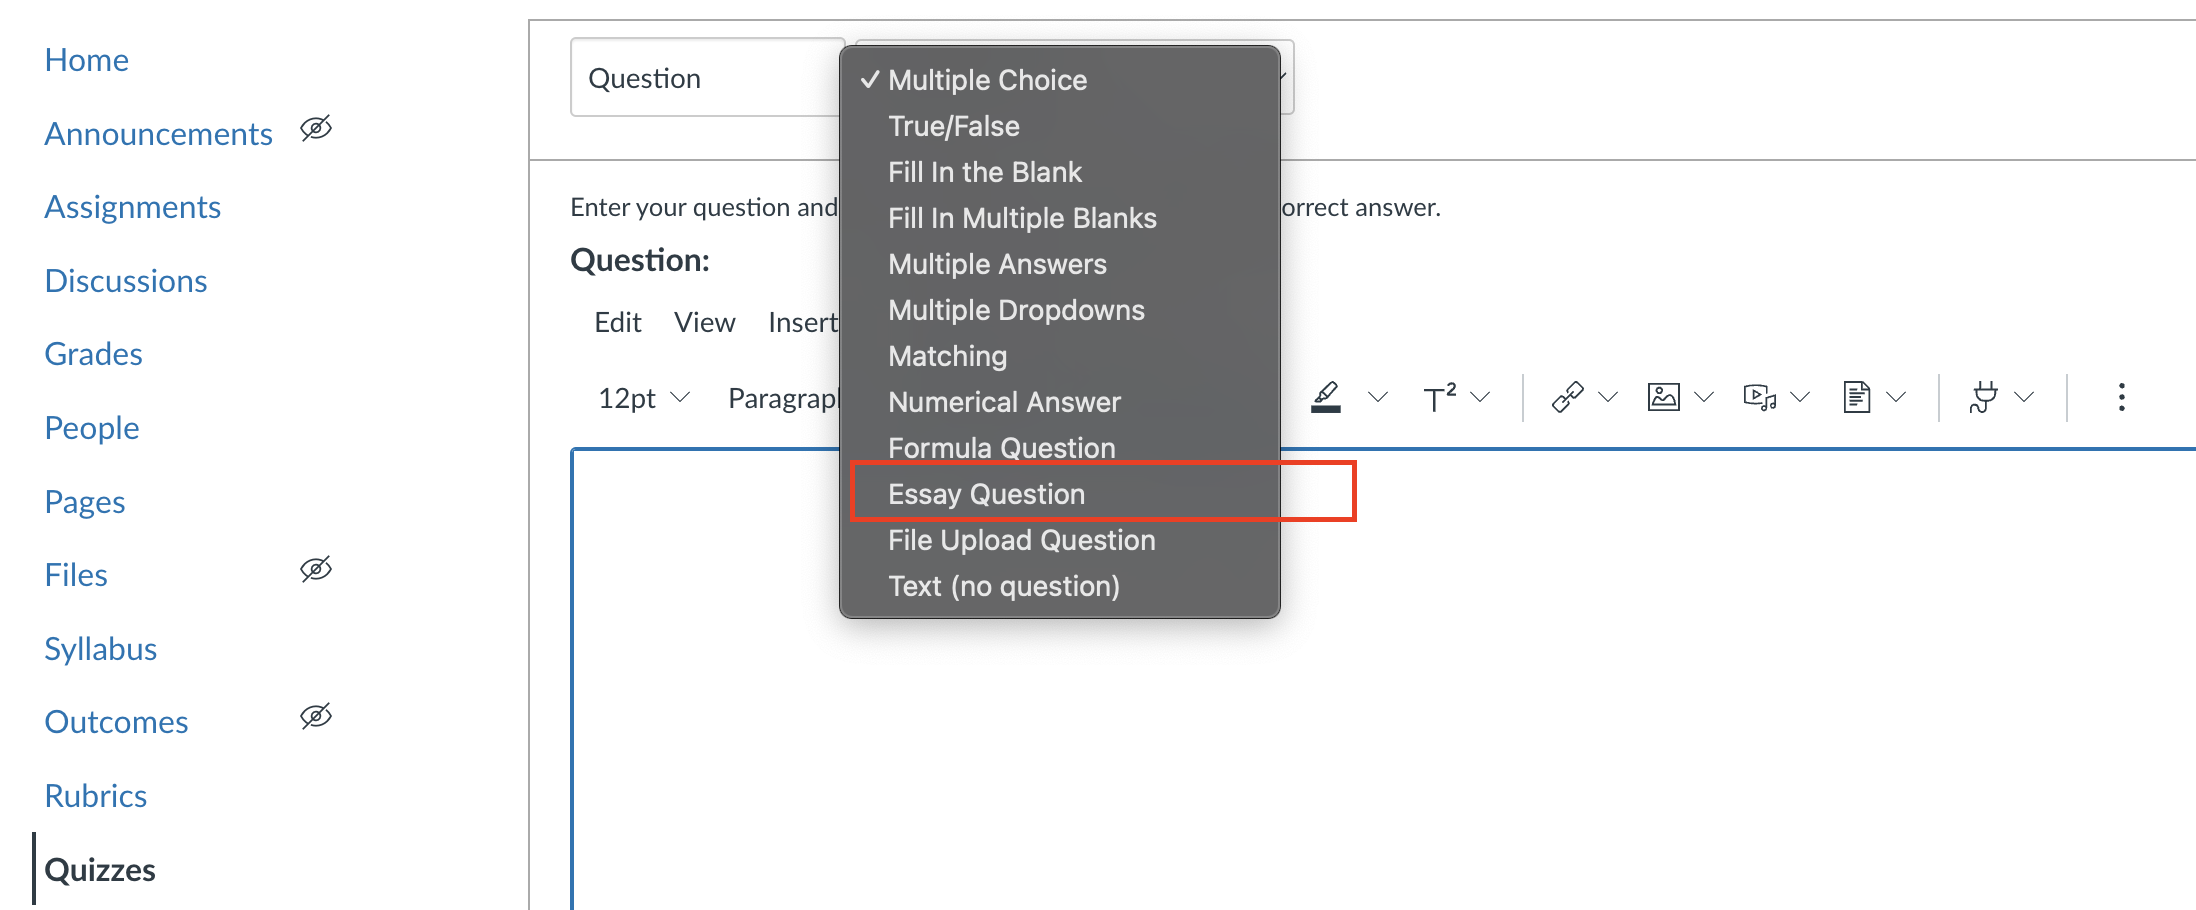
1) Create Essay Questions on Canvas
You need to create a quiz on Canvas that only have Essay Question, which only use to collect grades:
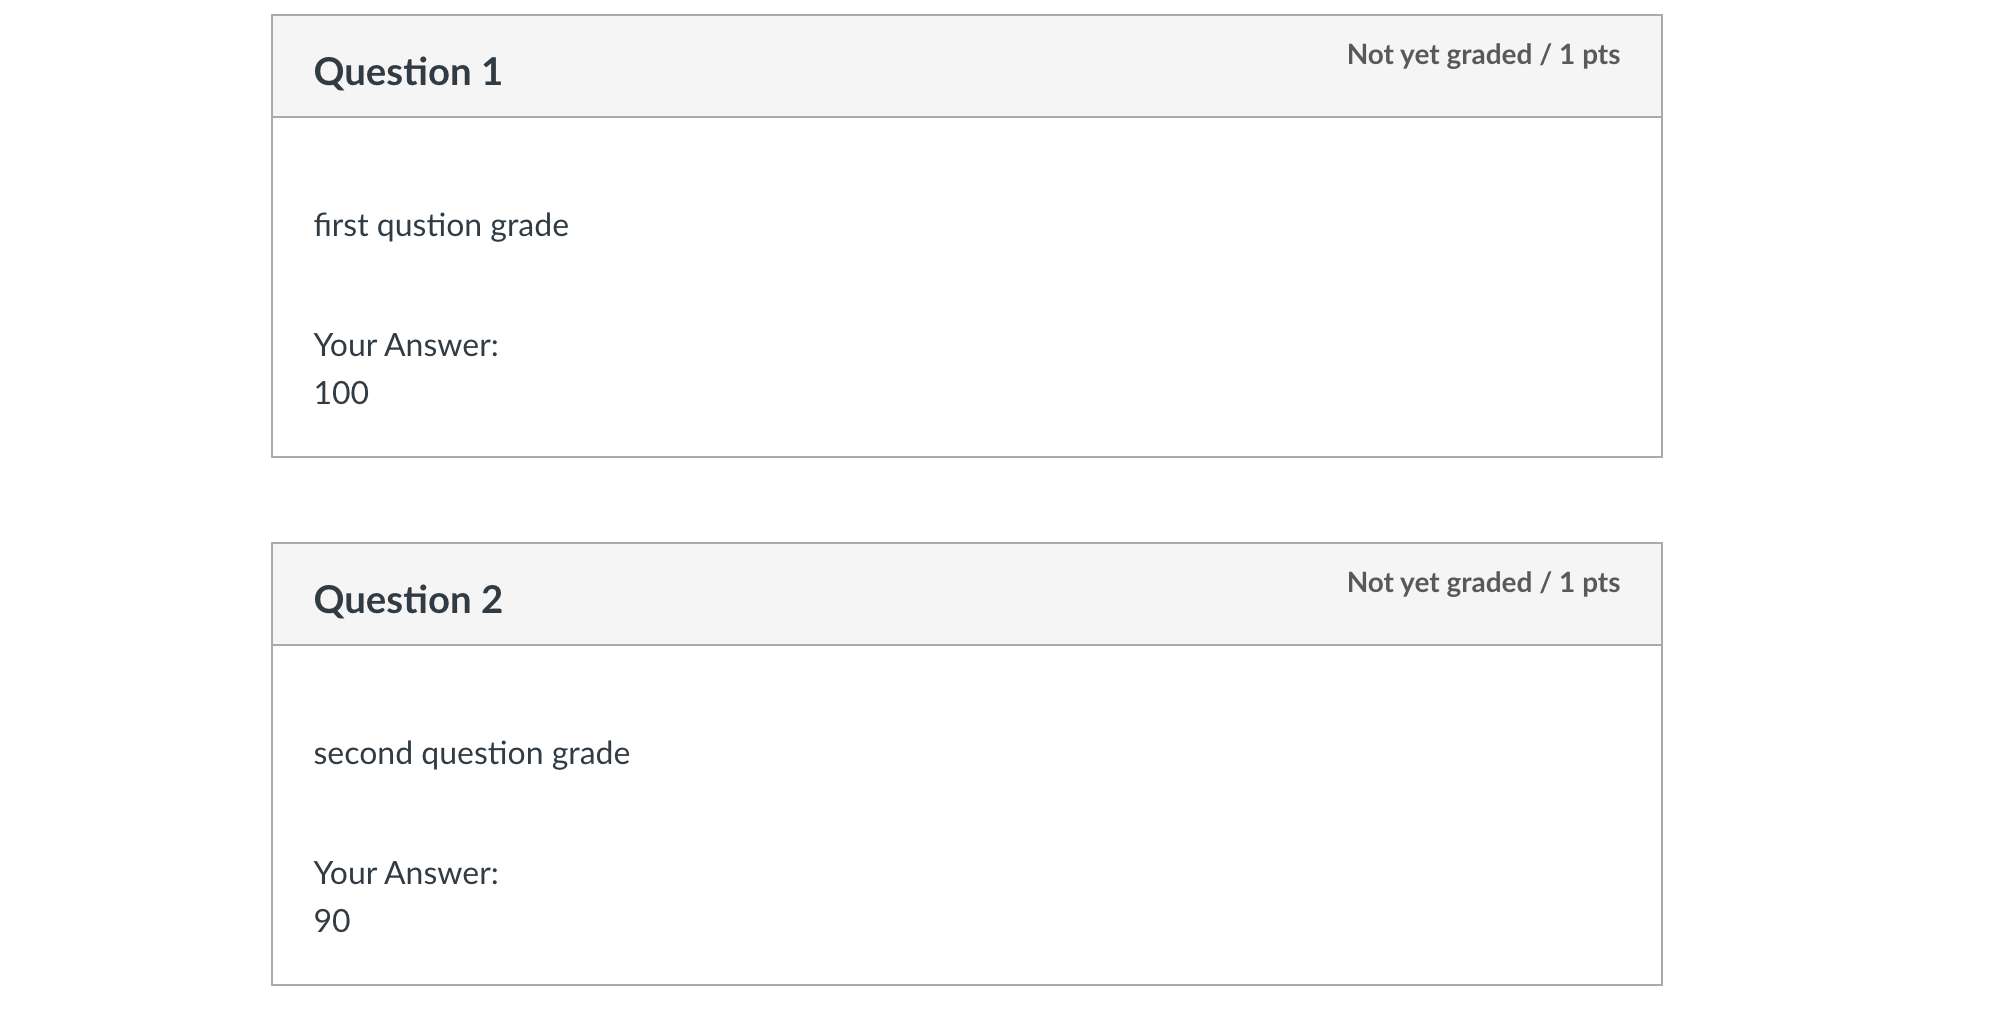
 We support user to create multiple question in Canvas, and the length of
 grade list should be equal to the number of questions.
After you run the code above, you will see following result:
You can use submit_canvas_quiz function.
Arguments:
| Argument | Type | Description |
|---|---|---|
teacher_token | str | Authorization token for the teacher. |
student_token | str | Authorization token for the student. |
course_id | str | The ID of the course containing the quiz. |
quiz_id | str | The ID of the quiz to be submitted. |
grades | list of str | A list of grades/answers to submit for the quiz. |
multiple_attempts | bool (optional) | Whether to allow multiple attempts for the quiz. (Default to False) |
Returns:
| Return Type | Description |
|---|---|
dict | A dictionary containing the response from the final quiz submission completion request. |
# You should get student token from `inputs`
student_token = inputs['student_token']

teacher_token = 'teacher_token'
course_id = 'course_id'
quiz_id = 'quiz_id'
grades = ["100", "90"] # Assume you already calculate the grade for two questions

# Execute the function
msc.submit_canvas_quiz(teacher_token, student_token, course_id, quiz_id, grades, multiple_attempts=False)
2) For Students to Complete the Quiz
You need to generate a student_token as the Quiz input access token.
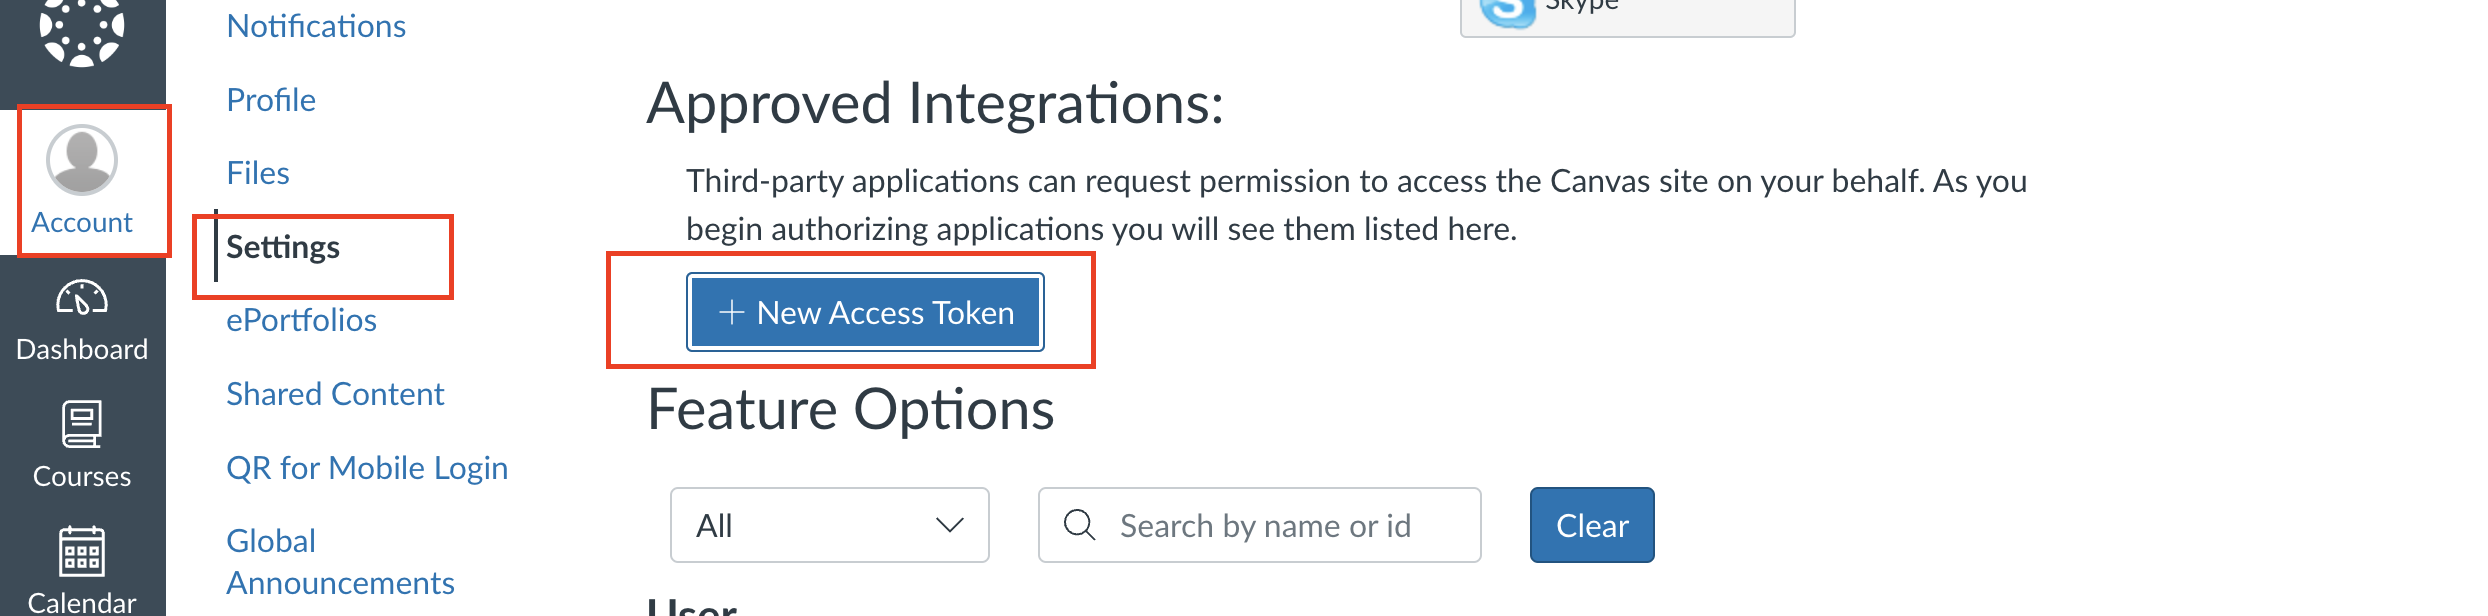
How to get student token
After sign in your Canvas account, click Account/Settings (link)
For student: this is the student_token you need to submit Mecsimcalc-Canvas quiz
For professor: this is the teacher_token you need to set up when you create the quiz app.
Do NOT leak your Token to others!!!
3) For Professors to Set Up the Quiz
You need to find teacher_token, course_id, quiz_id
How to get teacher token
Follow the same steps as above, and you will find your teacher_token in the same place as student_token.
How to get course and quiz id
You can find both of them from the URL.
For example, if the URL looks like: https://canvas.instructure.com/courses/123/quizzes/456, then course_id will be 123, quiz_id will be 456
How to Embed the Quiz into Your Website
You can embed your quiz into your website using an iframe tag, just like the Example part in this docs.
Find the Quiz URL
Copy the URL of your quiz from the address bar of your browser. For example: https://mecsimcalc.com/app/6170581/thevenin_equivalent_circuit_calculator
Add HTML Code to Your Website
Replace your_quiz_url with the URL of your quiz.
<div style={{width: "100%", height: "600px", overflow: "hidden"}}><iframe src="your_quiz_url" width="100%" height="100%" title="MecSimCalc" style={{position:"relative", left:"-45px", top:"-48px"}} frameBorder="0"></iframe></div>
Example
Below showcases an app that collects quiz results and append them to a Google Spreadsheet.
As you can see, the results from the app above will append to the sheet. (We make delete previous result each time only for demonstration)
For example, you can get student's name and id from the input, and calculate grade through code. If you want this information to be exported to your own Google Sheet and email, you can do it like this:
"""
Assume that inputs['name'] = "Joe", inputs['id'] = "186234", inputs['grade'] = 85
"""
import mecsimcalc as msc

def main(inputs):
    grade = ... #your logic here

    #values you want to collect
    values = [
    [ inputs['name'], inputs['id'], grade ],
    ]

    # For Google Sheet:
    service_account_info = {
        # We will teach you how to get this later, don't worry
    }
    spreadsheet_id = 'your_spreadsheet_id_here'

    msc.append_to_google_sheet(service_account_info, spreadsheet_id, values)


    # For Gmail:
    sender_email = 'sender@example.com'
    receiver_email = 'receiver@example.com'
    subject = 'Quiz Results'
    app_password = 'your_app_password_here'

    msc.send_gmail(sender_email, receiver_email, subject, app_password, values)
    ...
The output will be like this: