Quick Overview
MecSimCalc is a platform that simplifies the building and sharing of Python apps on the web. In a matter of minutes, you can transform any snippet of Python code to a computational app available instantly to the entire world wide web.
MecSimCalc gives you all the tools to build a modern online app without having to learn web programming languages, such as HTML, CSS, or Javascript.
In this documentation, the term developer is used to refer to the person who is developing an app on the platform, while the term user is used to refer to the person who would be using the app after development.
Step 1: Info
In the Info step, the developer specifies the app's name, description, category, and tags. This information can later help users to search and find the app. The developer can also upload different images of the app to appear in MecSimCalc search results.
Who can use your app?
The default setting is that Anyone can use your app! (Apps are also searcheable on Google). You can restrict access to your app by sharing it with only the people you want!
Sharing
| 🏆 This is a premium feature |
|---|
ℹ️ Note: You can only manage who has access to your app if you have a premium account, but your access settings WILL NOT CHANGE if you revert back to the free account!
- When editing your app select 'Only accounts you give access to' from the dropdown options.

- You can then enter the user emails that you want to share your app with!

Access is controlled by user email. If you share it with someone who doesn't have an account they will need to make one (with that email) in order to gain access to your app!
You must publish any changes you make to the access settings for them to be in effect!
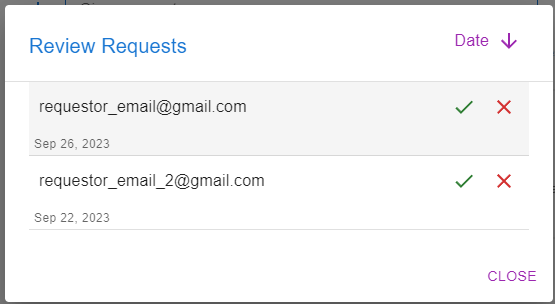
Reviewing requests
Sometimes users will request access to your app. You can click the "Review Requests" button to deal with any requests.
ℹ️ Note: The button is disabled if there are no requests
You can then accept ✔️ or decline ✖️ the requests.
Step 2: Inputs
In the Inputs step, the developer specifies the types and format of the inputs required from the user to run the app. This step also allows the developer to preview and test how the inputs page responds to the user's input.
By clicking on the ![]() button in the bottom right, the developer can add "input groups" and different types of inputs. "Input groups" are used to visually group the inputs, and must be added first before dragging inputs into the groups.
button in the bottom right, the developer can add "input groups" and different types of inputs. "Input groups" are used to visually group the inputs, and must be added first before dragging inputs into the groups.
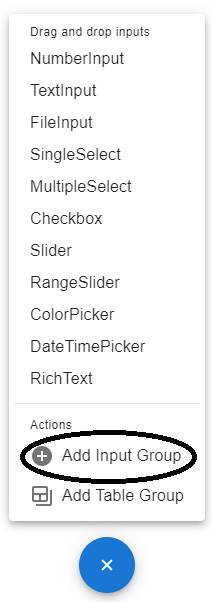
The developer can then drag and drop any of the available input types such as numerical inputs, text inputs, file inputs, and others from the inputs menu and into the input groups. The different inputs within an input group can be arranged, resized, and moved using the mouse.
The following example shows two input groups: "Input Group 1" and "Input Group 2". "Input Group 1" has two numerical inputs with default values of 0 and 10 while "Input Group 2" has a text input with a default value of "DefaultText".
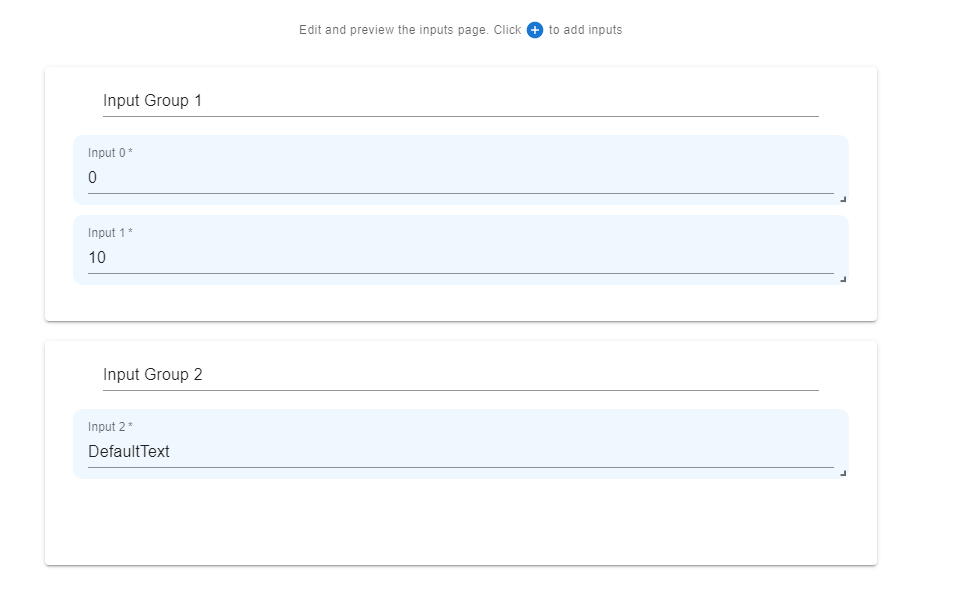
The developer can navigate to the preview section to view how the input page appears to the user:

When hovering over any of the added inputs, the edit button ![]() appears allowing the developer to edit the input's type, variable name (to be used at the later steps), default value, precision for numerical inputs, and other settings.
appears allowing the developer to edit the input's type, variable name (to be used at the later steps), default value, precision for numerical inputs, and other settings.
Step 3: Code
In the code step, the developer is expected to write a Python function called: def main(inputs):. The inputs of the main function are the user inputs defined in the inputs step. The main function is expected to return a dictionary whose values are to be displayed in the output step.
By clicking on <> Input Variables in the sidebar on the right, the developer can view and copy the names of the input variables available to the main function.
As an example, the following main function adds two numerical inputs, input_0 and input_1, and returns their sum, out1. It also returns the third text input input_2 as out2:
def main(inputs):
    out1 = inputs['input_0'] + inputs['input_1']
    out2 = inputs['input_2']
    return {"Sum":out1, "Message":out2}
The dictionary keys, Sum and Message, are available for the developer to display anywhere on the output page (as explained in the next step).
Step 4: Output
In the output step, the developer displays the values returned from Step 3 using a familiar WYSIWYG (What You See Is What You Get) editor.
The dictionary key-value outputs from the code step can be embedded anywhere in the output page using the syntax {{outputs.key}}. As an example, the following output page displays the values of Sum and Message generated in the example in the code step.

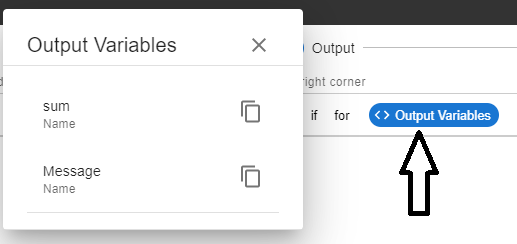
The outputs available for the developer to embed in the output page can be viewed and copied by clicking on <> Output Variables.
The developer can also use conditional logic in designing the output page. By clicking on if or for in the toolbar, the syntax needed for these logical expressions is automatically generated.
As an example, the following output page displays the value of the Sum only if it is greater than 0.

Step 5: Docs
In the docs step, the developer can provide a documentation page on how to use the app, or any references or other relevant information for the app.
Step 6: Preview
In the final preview step, the developer can test the app before publishing it. Once published, the app's status changes from draft to published and the app becomes publicly available and shareable at a unique url.
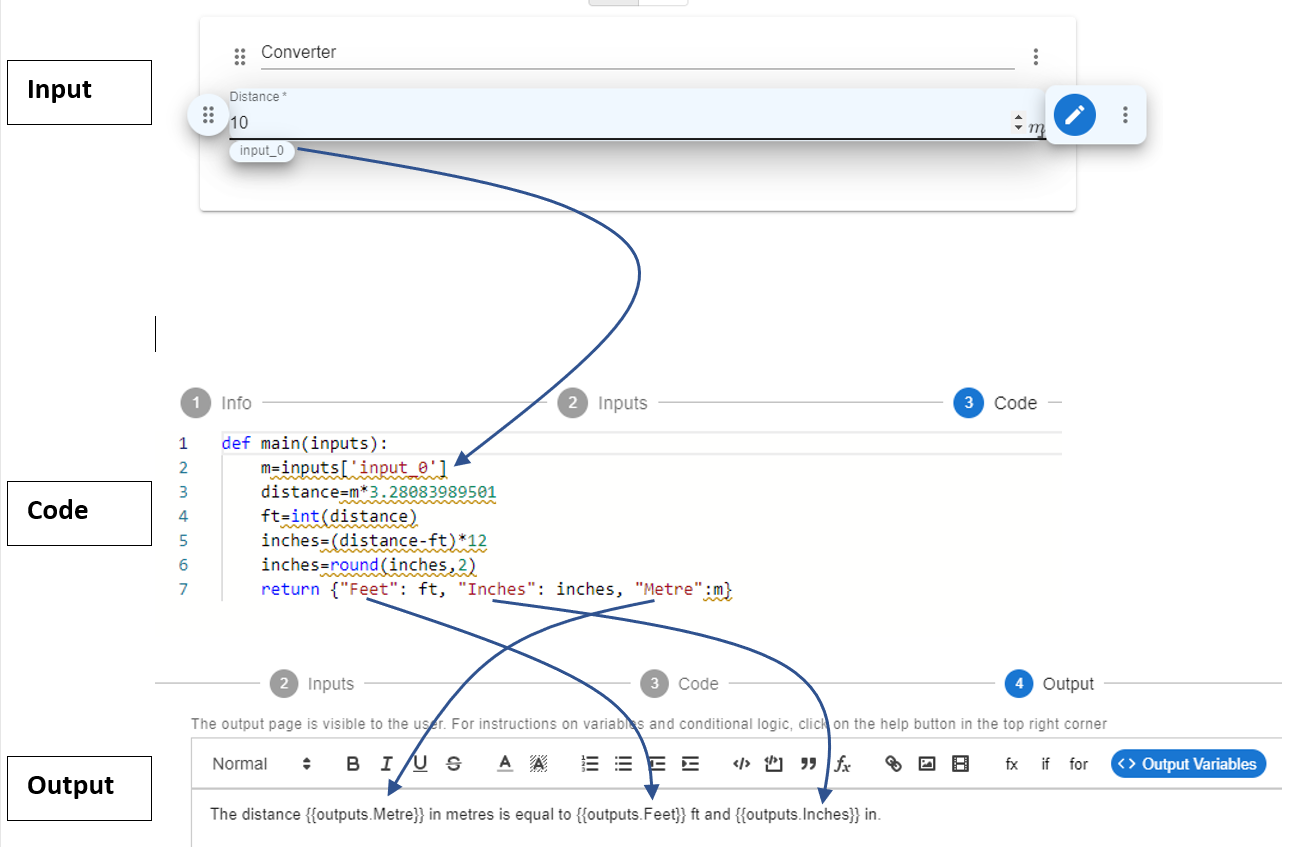
Main Steps of an App
The inputs, code, and outputs steps are the 3 layers that make an app. The developer designs an inputs page whose values are then available as input to the Code step main function. The outputs of the the main function can then be embedded into a nicely formatted output page.
The following diagram show how these steps work together to create the distance converter web-app. The inputs page requests the value of input_0 from the user, which is then used as a variable in the Python code (inputs['input_0']). The function main(inputs) then returns a dictionary of three keys: Feet, Inches, and Metre. These three keys are embedded into the output page using the syntax {{outputs.Feet}}, {{outputs.Inches}}, and {{outputs.Metre}}, respectively. The app is also also explained in details in Example 1