Table Group
Similar to an Input Group, a Table Group allows the developer to visually group inputs. A Table Group can be created in the Inputs step by clicking on Add Table Group.
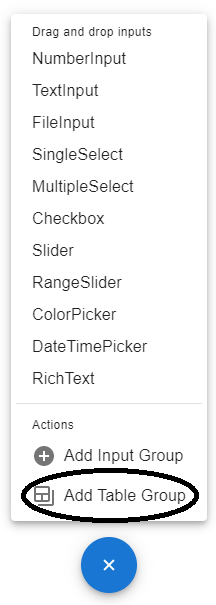
The different input types appear in the menu only if an Input Group or a Table Group has already been created.
The Table Group behaves similarly to an Input Group in that the developer can create as many new Table Groups as needed, which are arranged vertically. Similarly a Table Group can be renamed, deleted, or dragged to change its vertical position relative to other Input Groups or Table Groups.
Table Group Layout
The main differences between a Table Group and an Input Group is:
- The inputs share the same fixed width and cannot be resized.
- The Python variable available in the Code section is a two dimensional nested array (eg.
[[1,2],[3,4]]). - The number of columns and the variable name are specified by the developer in the edit table popup.
There are also many similarities including:
- No restrictions on the type of input in each cell.
- Cells can be left empty.
For example, the following Table Group has three columns and 1 row. The header can be made using RichText input type and does NOT count as a row. The array name available for the Code step is table.
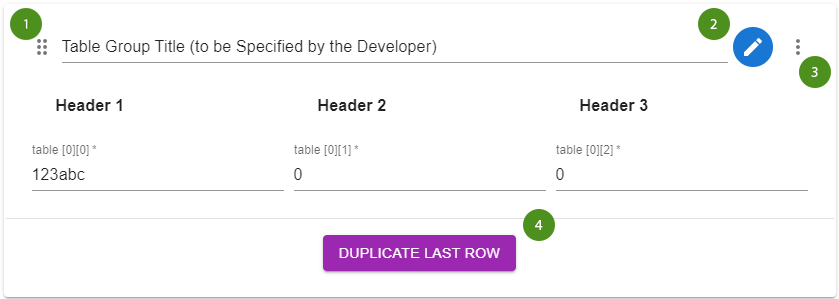
- Drag the Table Group to order it vertically amongst the other groups
- Edit the Table Group properties (described below)
- Delete the Table Group
- Duplicate the last row in the current Table Group (similar to duplicate input but for the whole row)
Editing a table group
To edit the table group, click the ![]() icon near the top right side of the table group. A popup will appear with the following options:
icon near the top right side of the table group. A popup will appear with the following options:
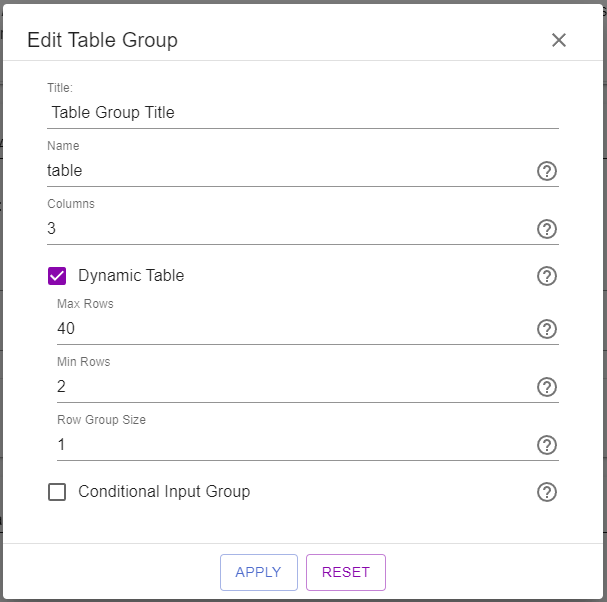
- Title → the title of the table group
- Name → this is the variable name of the table which will be used in the python code
- Columns → the number of columns in the table
| 🏆 The following are premium features |
|---|
- Dynamic Table → check this box if you want the user to be able to add and delete rows from the table
After checking this box a list of options will appear:
a) Max Rows → The maximum number of rows that can be in the table (NOT including the header row)
b) Min Rows → The minimum number of rows that can be in the table (NOT including the header row)
c) Row Group Size → The number of lines that make a single row that can be added and deleted (This should almost always be set to 1 ...unless your row is comprised of multiple lines) - Conditional Input Group → Learn more
Don't forget to click on APPLY after editing the properties of the Table Group
Dynamic Table
The following embedded app demonstrates the Dynamic Table feature using the Table Group properties shown above. Enter the values and press submit to calculate the weighted GPA.
Use the Dynamic Table template (under Advanced) to start creating a similar app!
The code simply loops through each row of the table to get the grade and weight values.
import mecsimcalc as msc


def main(inputs):
    # get input table (list of rows)
    input_table = inputs['table']

    # make the headers for the table
    headers = ['Subject', 'Grade']

    # transform the table into an html table using the mecsimcalc library
    table = msc.print_table(headers, input_table)

    # calculate the grade average
    rows = len(input_table)
    sum = 0
    for i in range(0, rows):
        sum += input_table[i][1]

    average = sum / rows

    # return the table in a dictionary
    return {'table': table, 'average': f'{average:.2f}'}
The number of rows in the table will not be known beforehand, therefore using len(tableName) in the python code is essential.
This will allow you to get the # of rows in the table and then you can use it how you like!
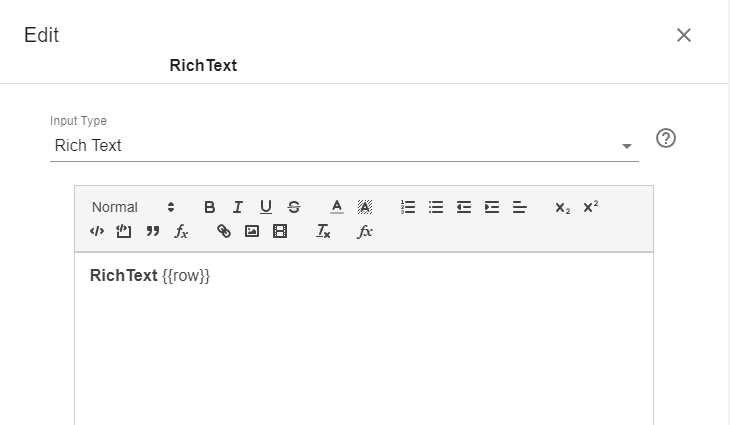
Labeling Rows
If the Dynamic Table feature is enabled, the # of rows that will be used is unknown.
In order to have the rows labeled correctly, you can use the {{row}} placeholder.
This can be used in two different ways:
- In an input label
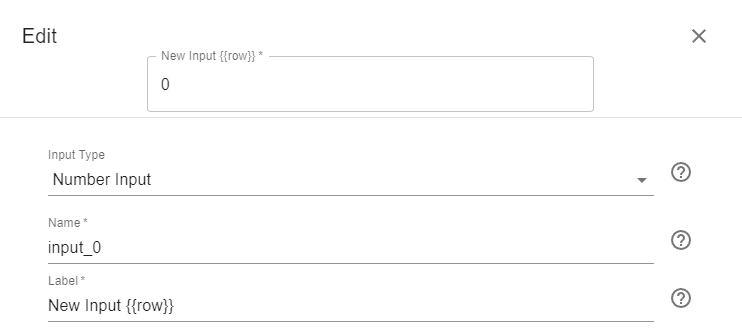
- In a Rich Text input